
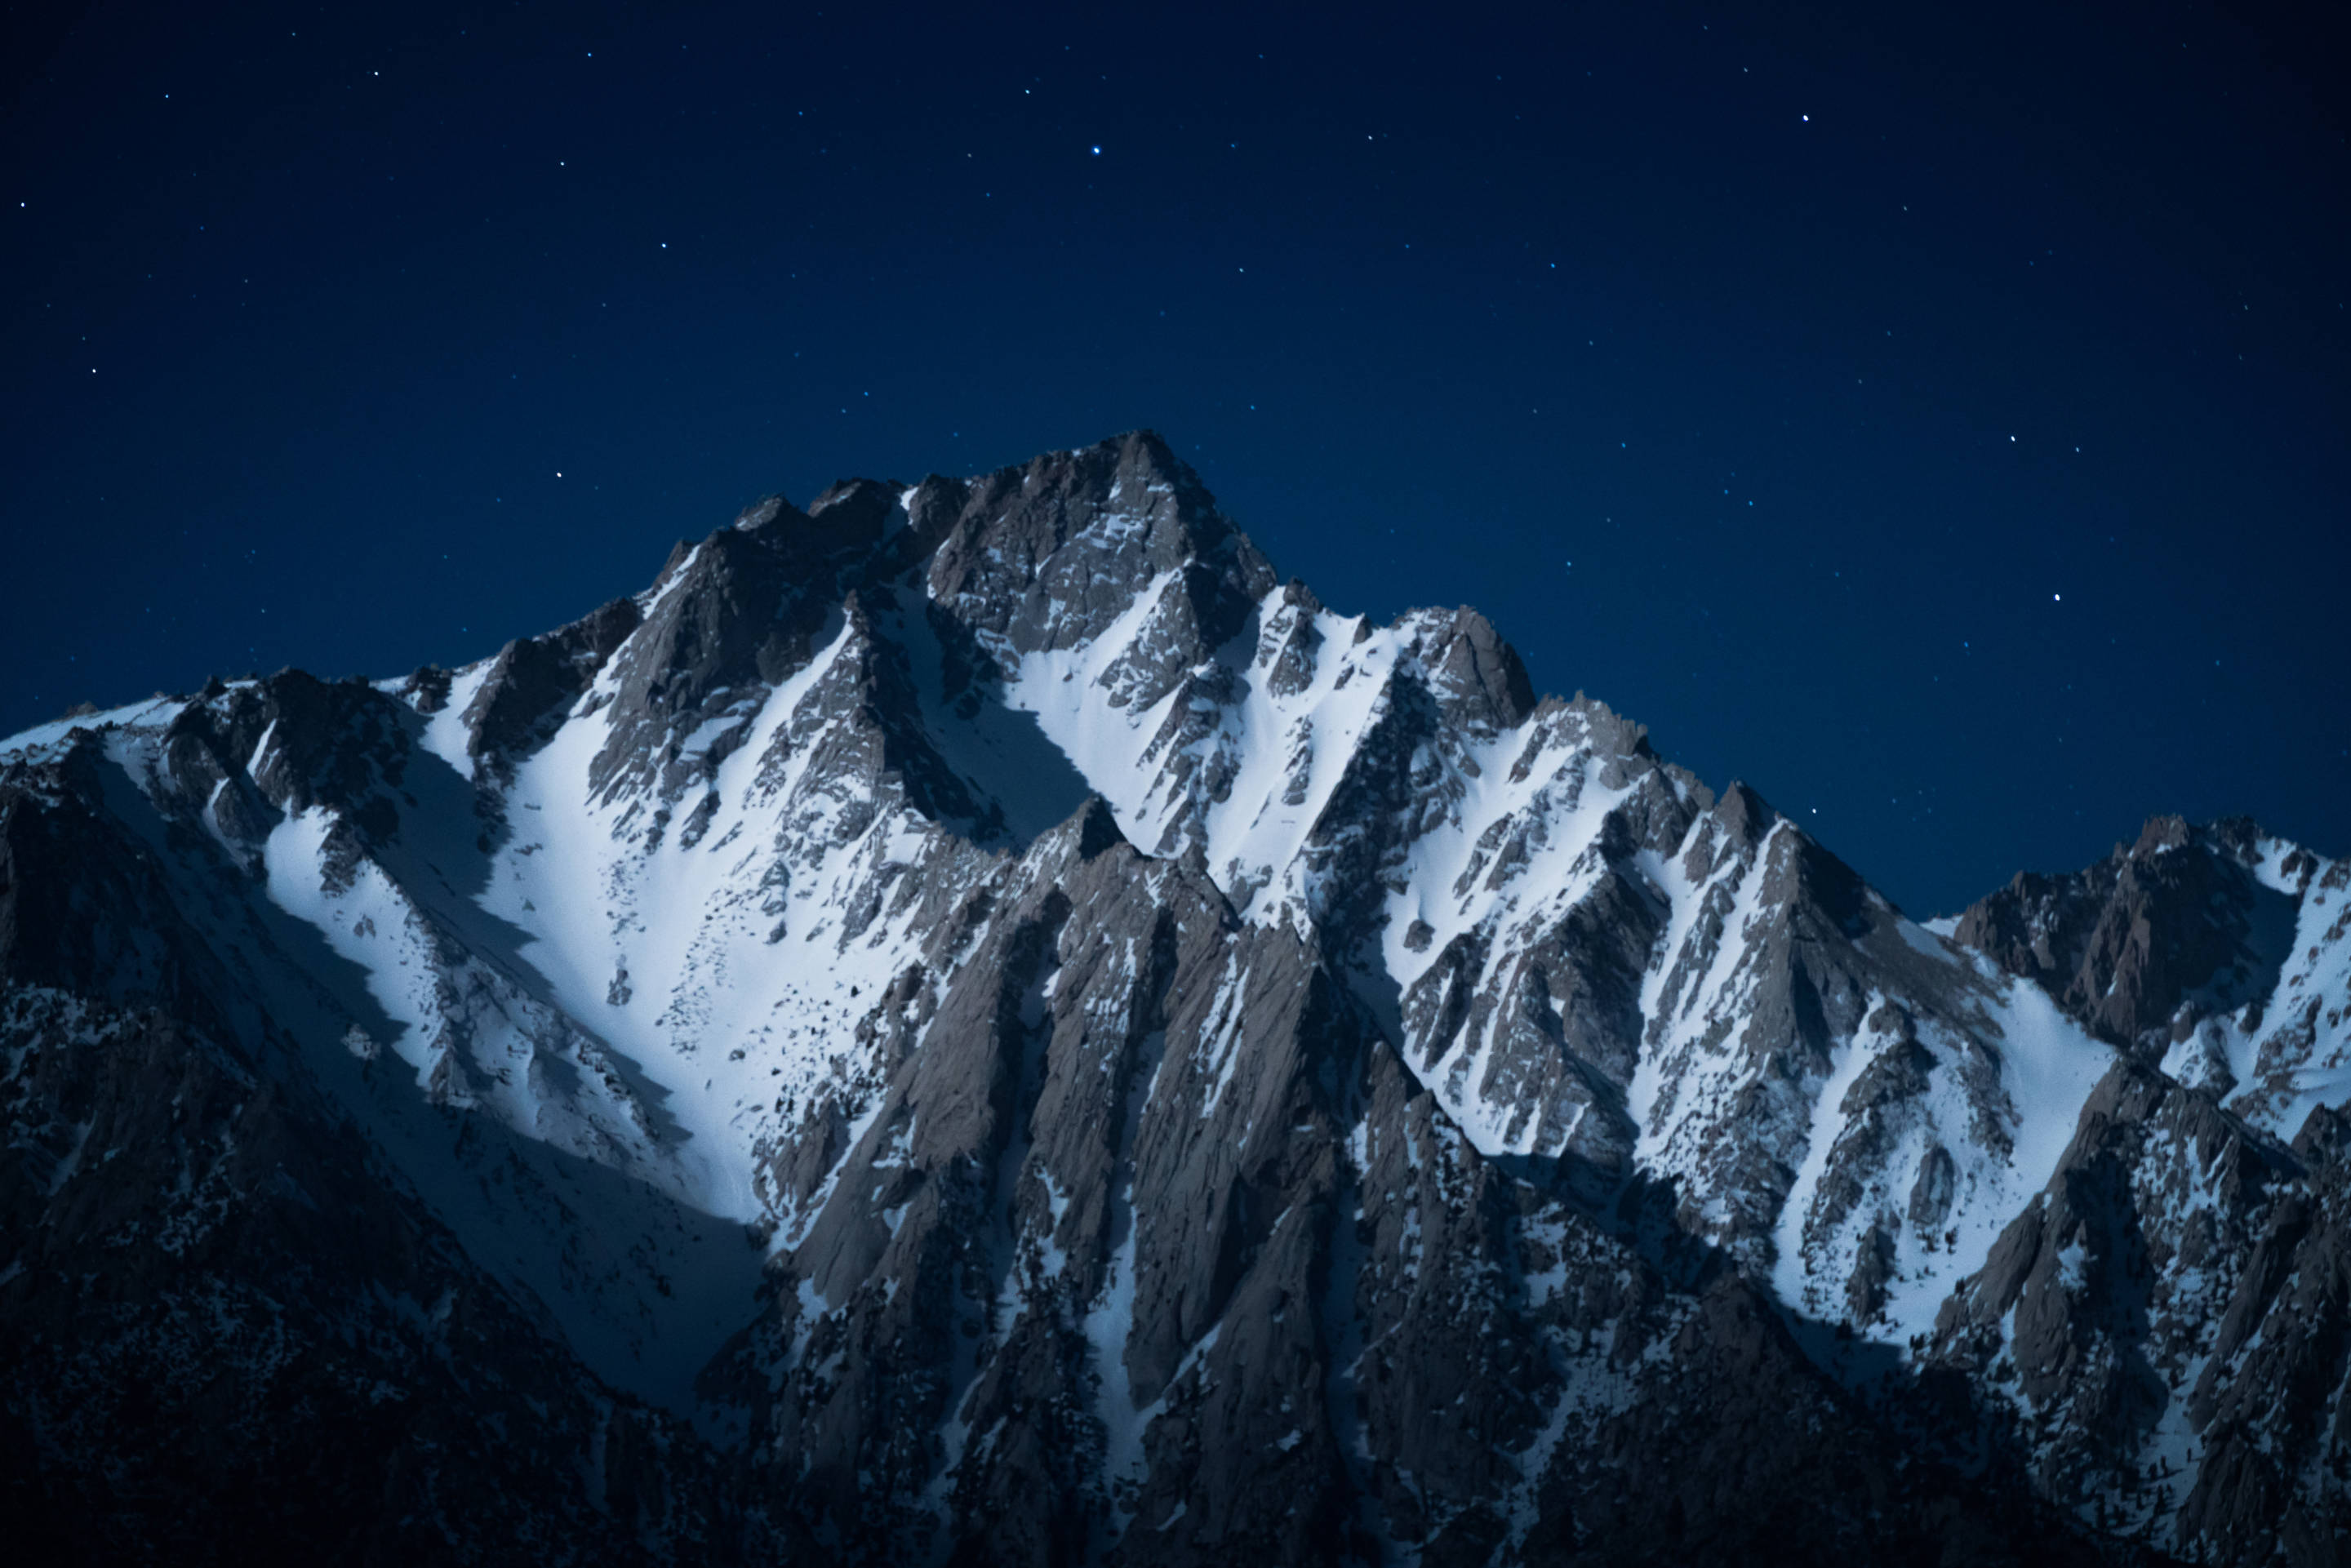
Tips for photographing with moonlight
With the recent advancement in cameras’ low light capabilities, photographing the night sky has become increasingly popular. In the summer months on nights with no moon, popular viewpoints become packed with photographers hoping to capture the Milky way Galaxy. And it’s hard to blame them.. the milky way is absolutely stunning and is an excellent subject to photograph. When photographing the milkyway, you usually want little to no moon. That leaves photographers around 5 days per month to capture it throughout the night.

It can be easy to overlook the potential for a great photo when the moon phase is more than a sliver and the stars and Milkyway are less vivid. While I understand the appeal of photographing the milkyway, I feel like a lot of us can feel held back and limited when it comes to shooting the night sky on nights with a moon. For me, I love how moonlight can subtly enhance the details of a foreground in such a natural and surreal way as well as provide a simple, clean sky with fewer stars.

Tips:
- Pay attention to the moon phase. Choose a night with less than a 50% moon. If the moon is closer to being full, try and photograph it as it’s rising or setting. If the moon is closer to being full, I find that it washes out too many of the stars. I use an app called “The Moon” to tell me the moon’s brightness on any given day as wells as set/rise times.

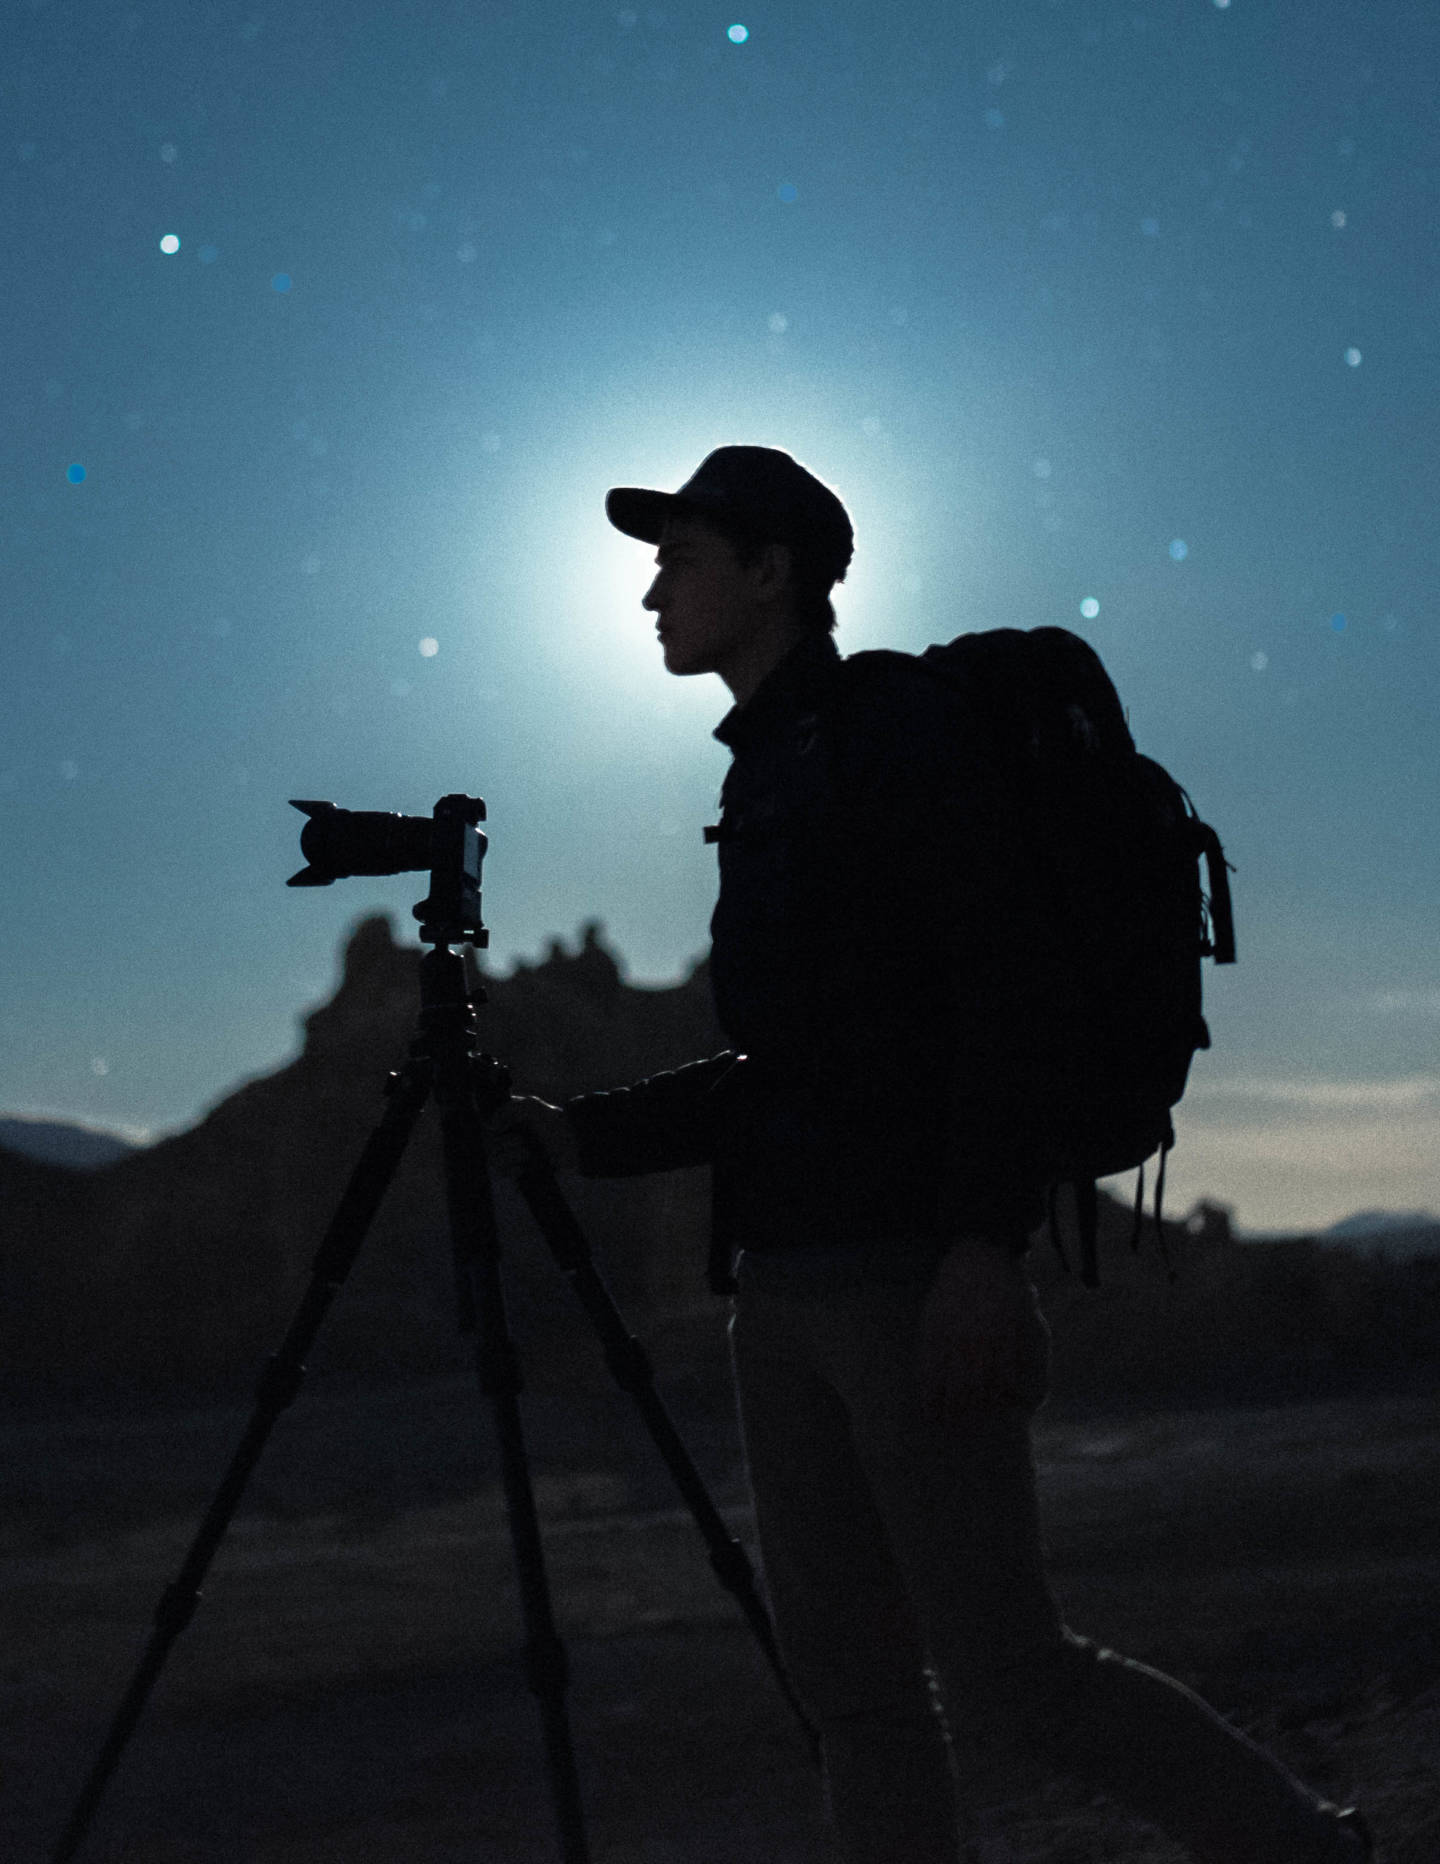
- Shoot with your back to the moon!
If you shoot facing away from the moon, you will be able to see more stars and avoid a crazy blown out glow of light. Of course there are exceptions to this but keep in mind that if you want to see the moon, you’ll often need to do extensive exposure blending to avoid intense, blown out highlights.
3. Watch out for shadows!
If you're shooting in a flat landscape and facing away from the moon, your image could have your shadow in it. To combat this, I use my CLT 204 tripod and extend the legs out so that the camera is much lower to the foreground. Then, I’ll set a 10 second delay and walk out of frame so that my shadow isn’t in it at all and the amount of time I spend photoshopping unwanted shadows out is minimal. If it happens to be a windy night and you worry about stepping away from your camera to do this, remember that you can always add a weight such as a bag to the hook found at the bottom of your center column tog make your tripod even more stable!

- Slightly Underexpose your image
I think that one of the most common mistakes in photographing moonscapes is that photographers expose for the foreground trying to make it as bright as possible.
In turn, the photos they take end up looking like a bright, day time scene. When you're out shooting, keep in mind that you should slightly underexpose your image to maintain that night time look and make the light that is there, even more powerful and surreal.
- A Cooler White Balance is Key!
White Balance, just like exposure can really affect whether or not your photo looks like it was taken mid day or at night. To maintain that night time look, I recommend going with a cooler, more blue toned white balance. Make sure your camera is set to shoot RAW so that you are able to adjust the white balance once you’re back on the computer editing!
- The moon moves! The moon, just like the sun is always moving so keep in mind that your scene could look completely different in just an hours time. To predict the moon’s path and how that can impact your composition, use an app called PhotoPills.
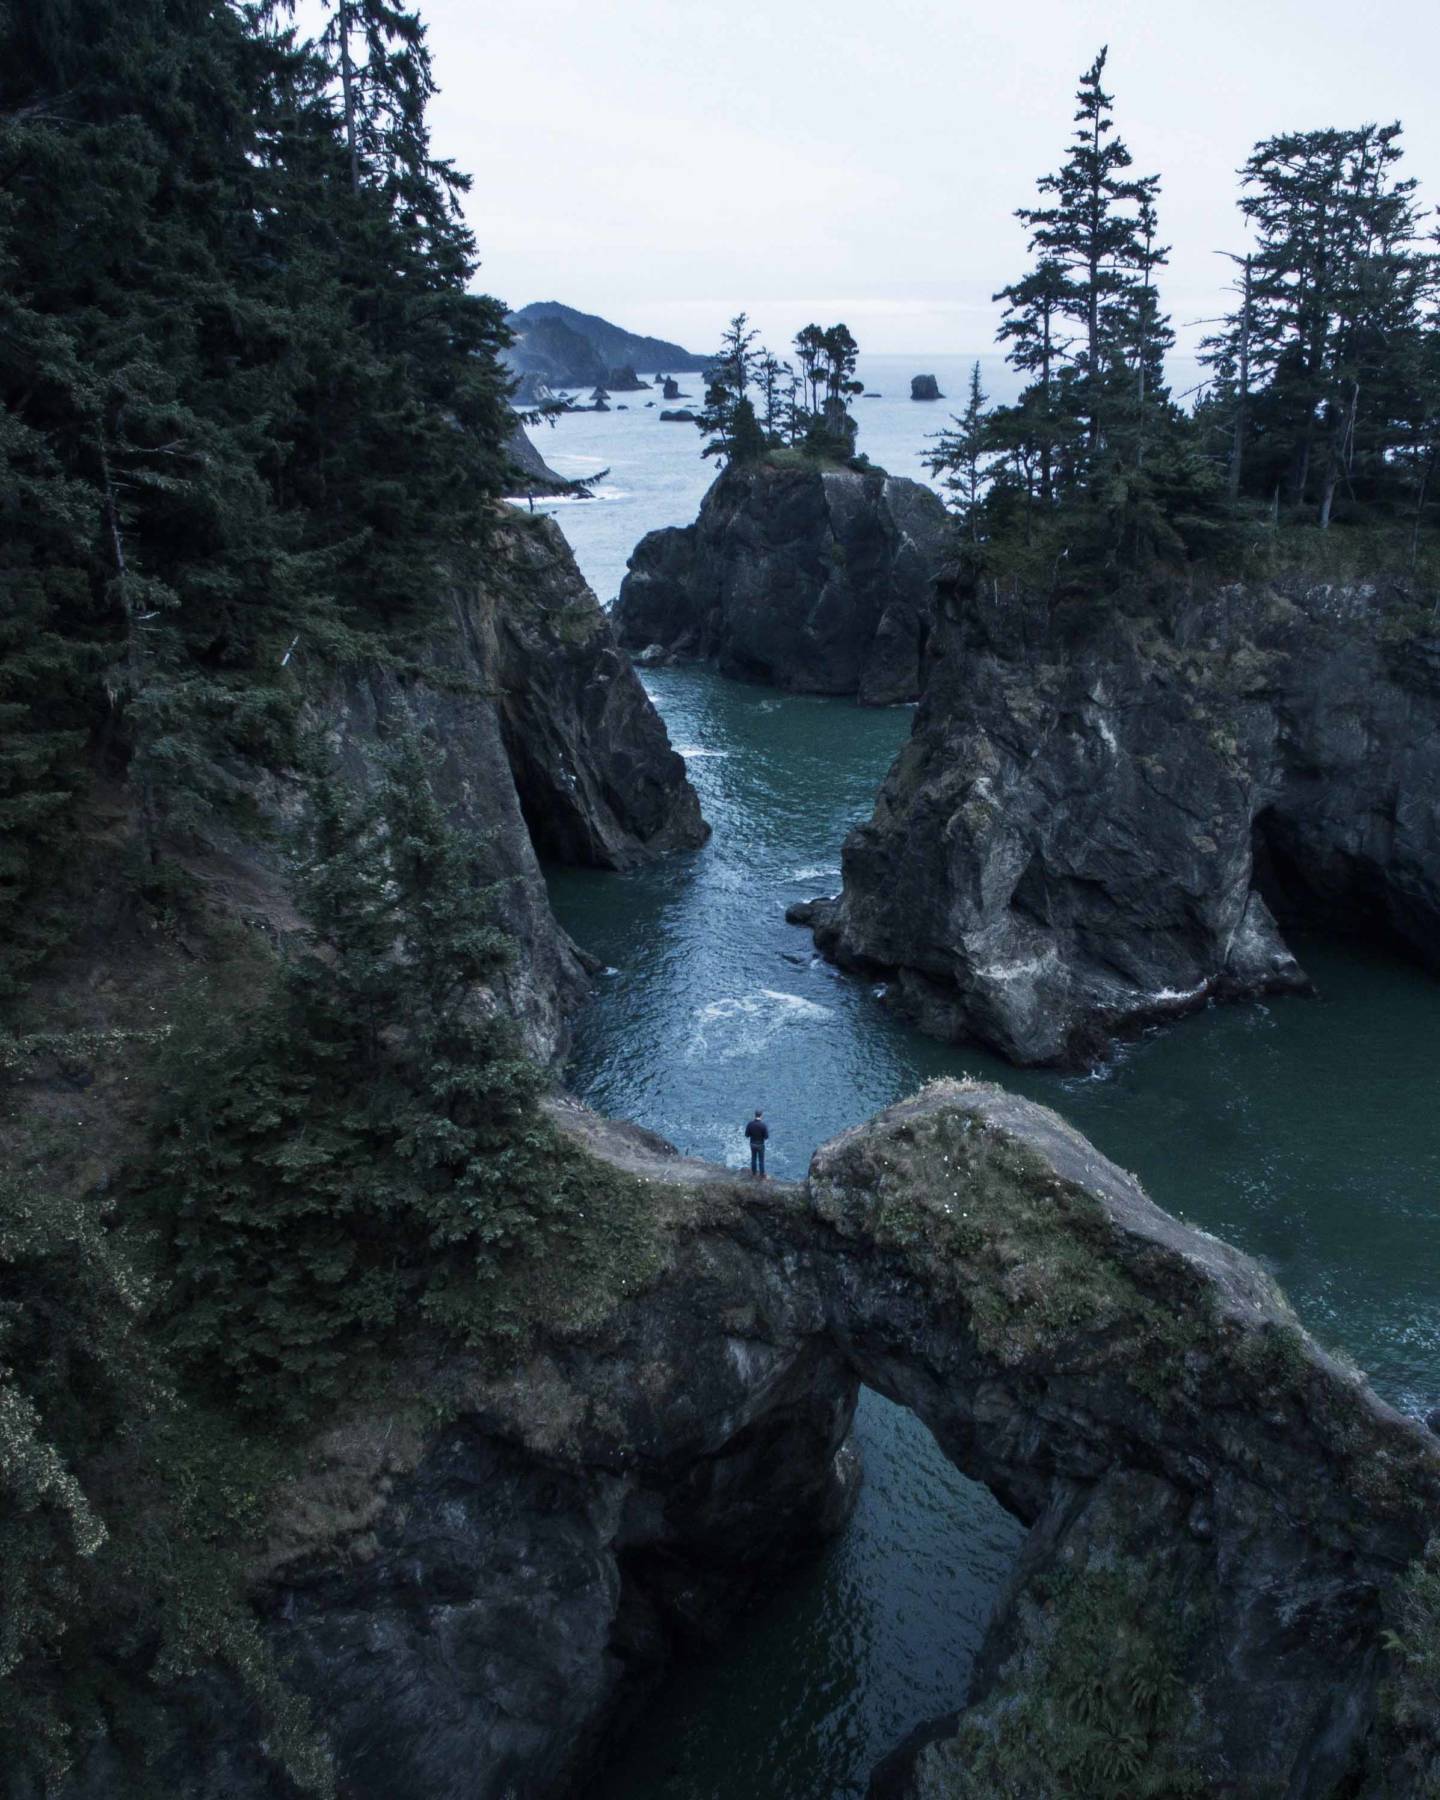
- Composition matters…even more! Remember that a compelling composition is important for a great image! Use the moonlight to illuminate an interesting foreground to bring your image to a new level! Sometimes including the human element can turn a good photo great!

I hope these tips help you when you’re photographing a moonlit scene and that you consider going out to shoot on nights with a moon! Thanks so much for reading!
Hawaii Volcanoes National Park
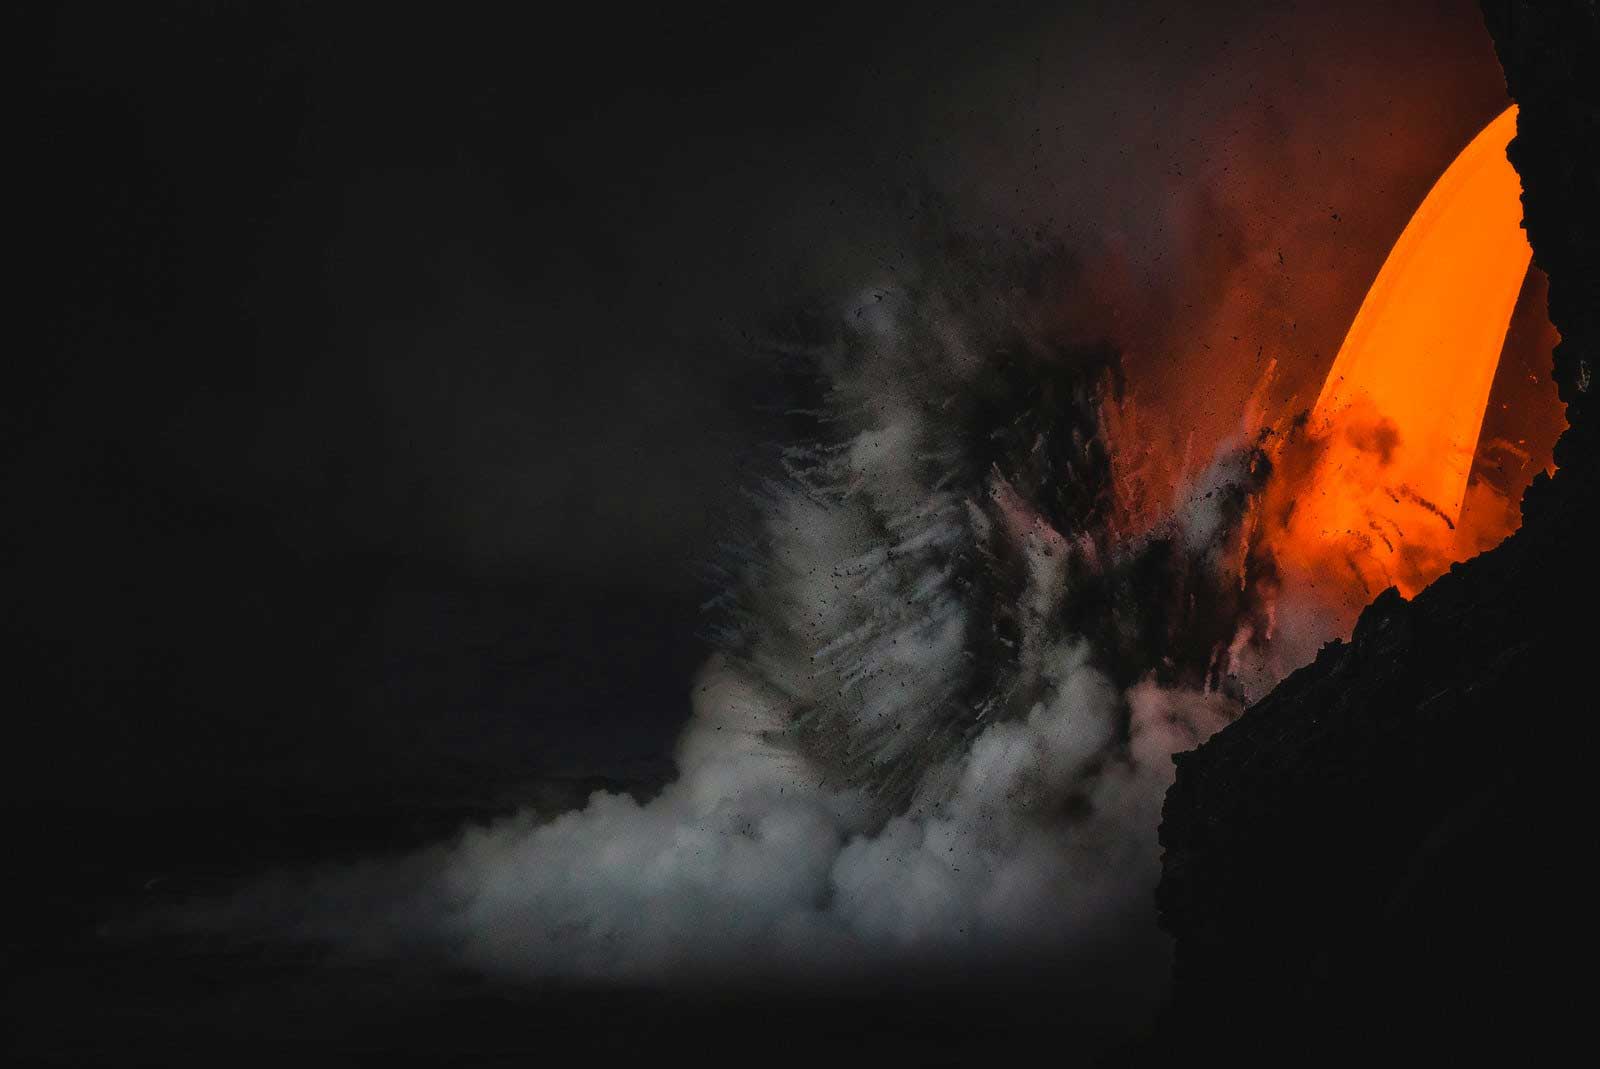
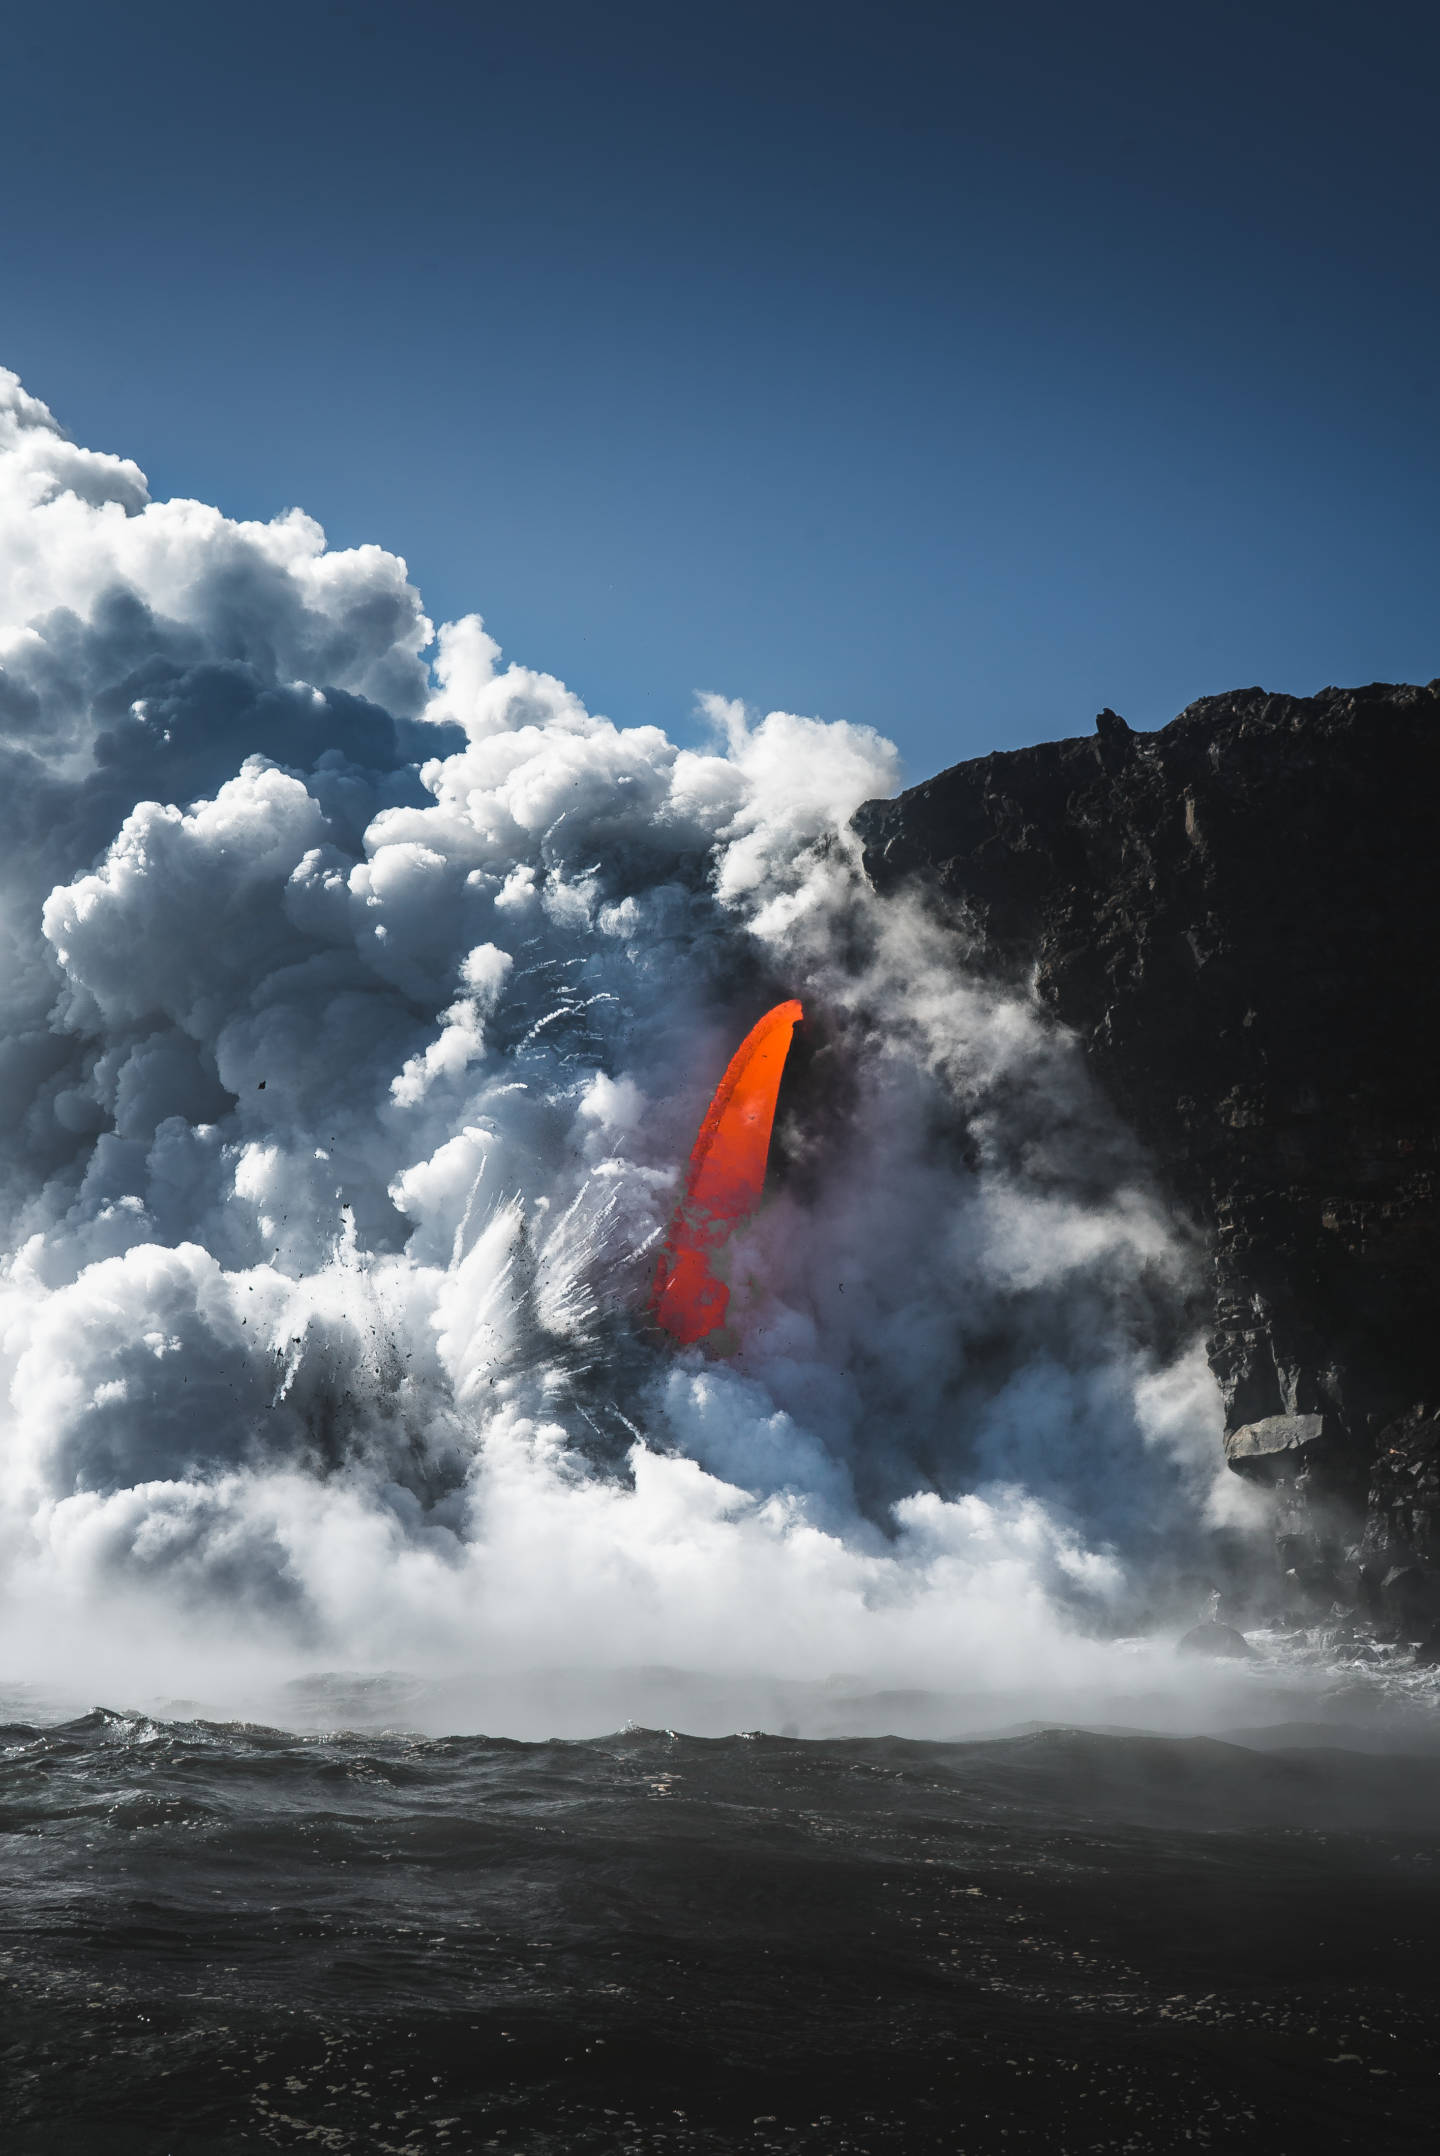
In January 2017, My friend and fellow photographer Michael Shainblum and I visited Hawaii Volcanoes National Park on the Big Island of Hawaii. By chance, we ended up timing our trip to Kilauea Volcano on the Big Island perfectly as a massive lava spout had just formed after a several month hiatus.
When we arrived, we visited Lava Light Galleries in Kona where we met up with our friend CJ Kale, an accomplished Volcano Photographer. CJ was kind enough to host us and share the experience of Kilauea Volcano. There’s no way our trip would have been quite as fantastic without him.
(Thanks for keeping us safe and sharing the island with us, CJ!)
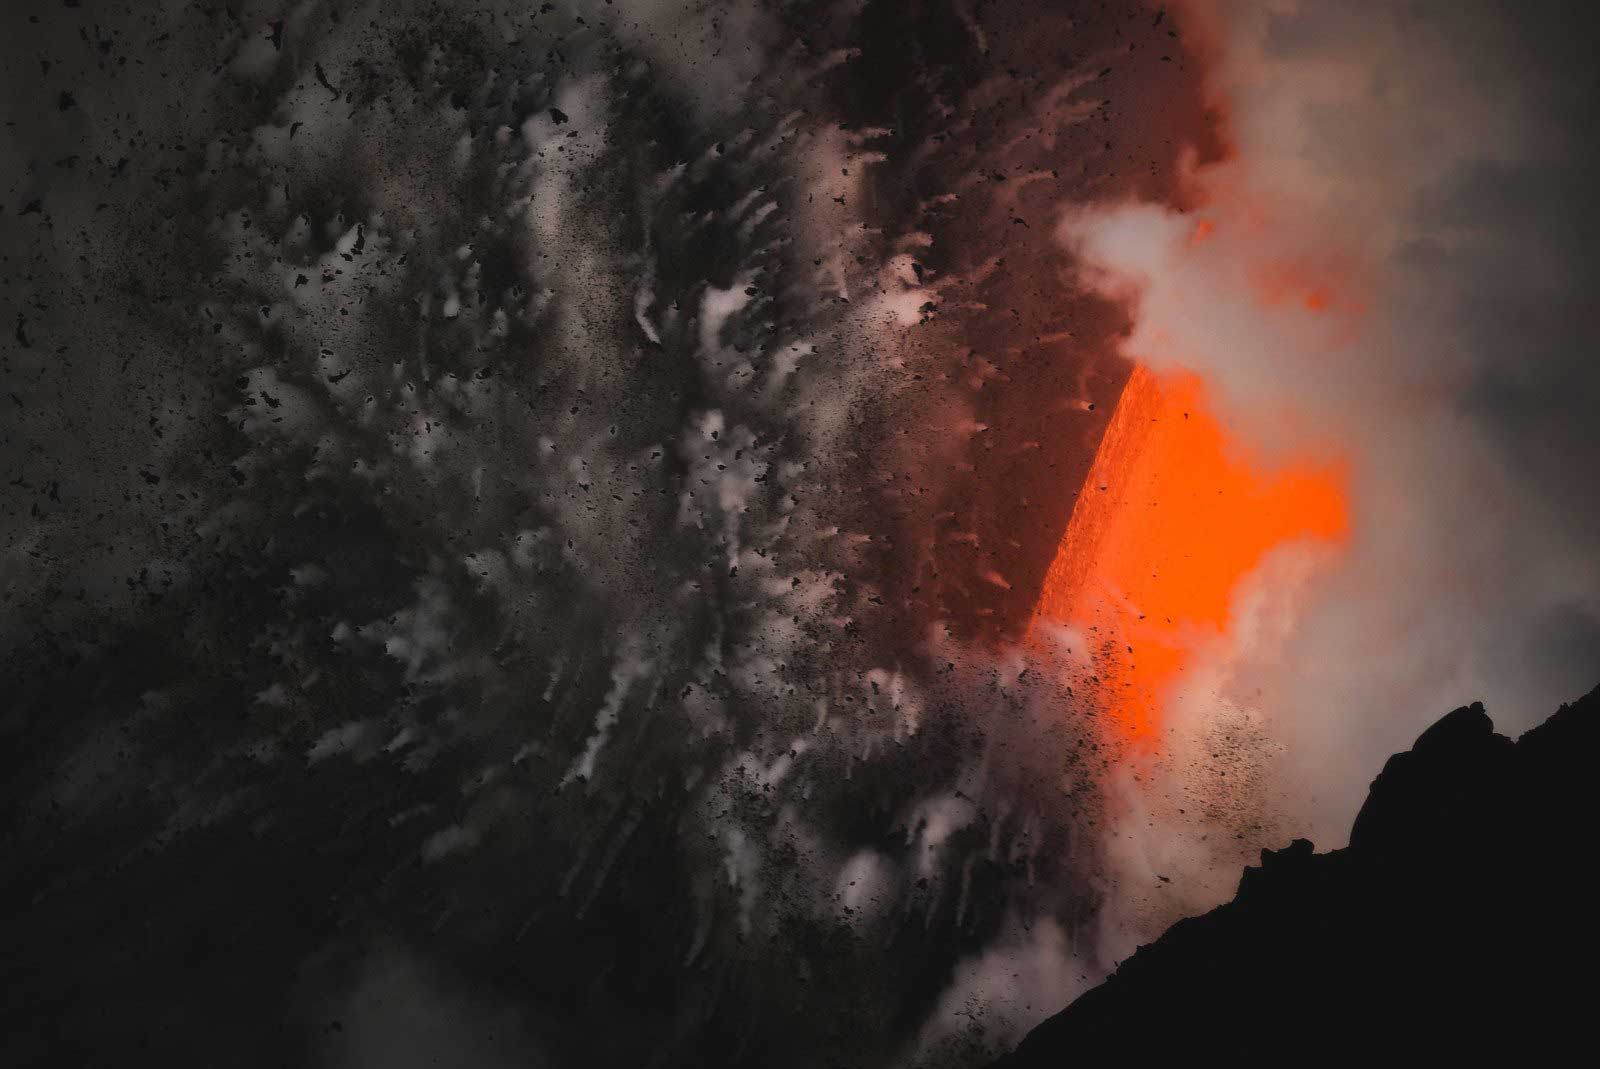
The following images were shot over the course of three treks out to the volcano. Each night, we would wake up at 3:00AM, drive out to Kilauea Volcano and hike to a viewpoint that put us just over a quarter mile away from the spout. As exhausted as we might have felt, we were filled with energy as we would watch explosions of freshly formed lava rock shoot high into the sky every few seconds.
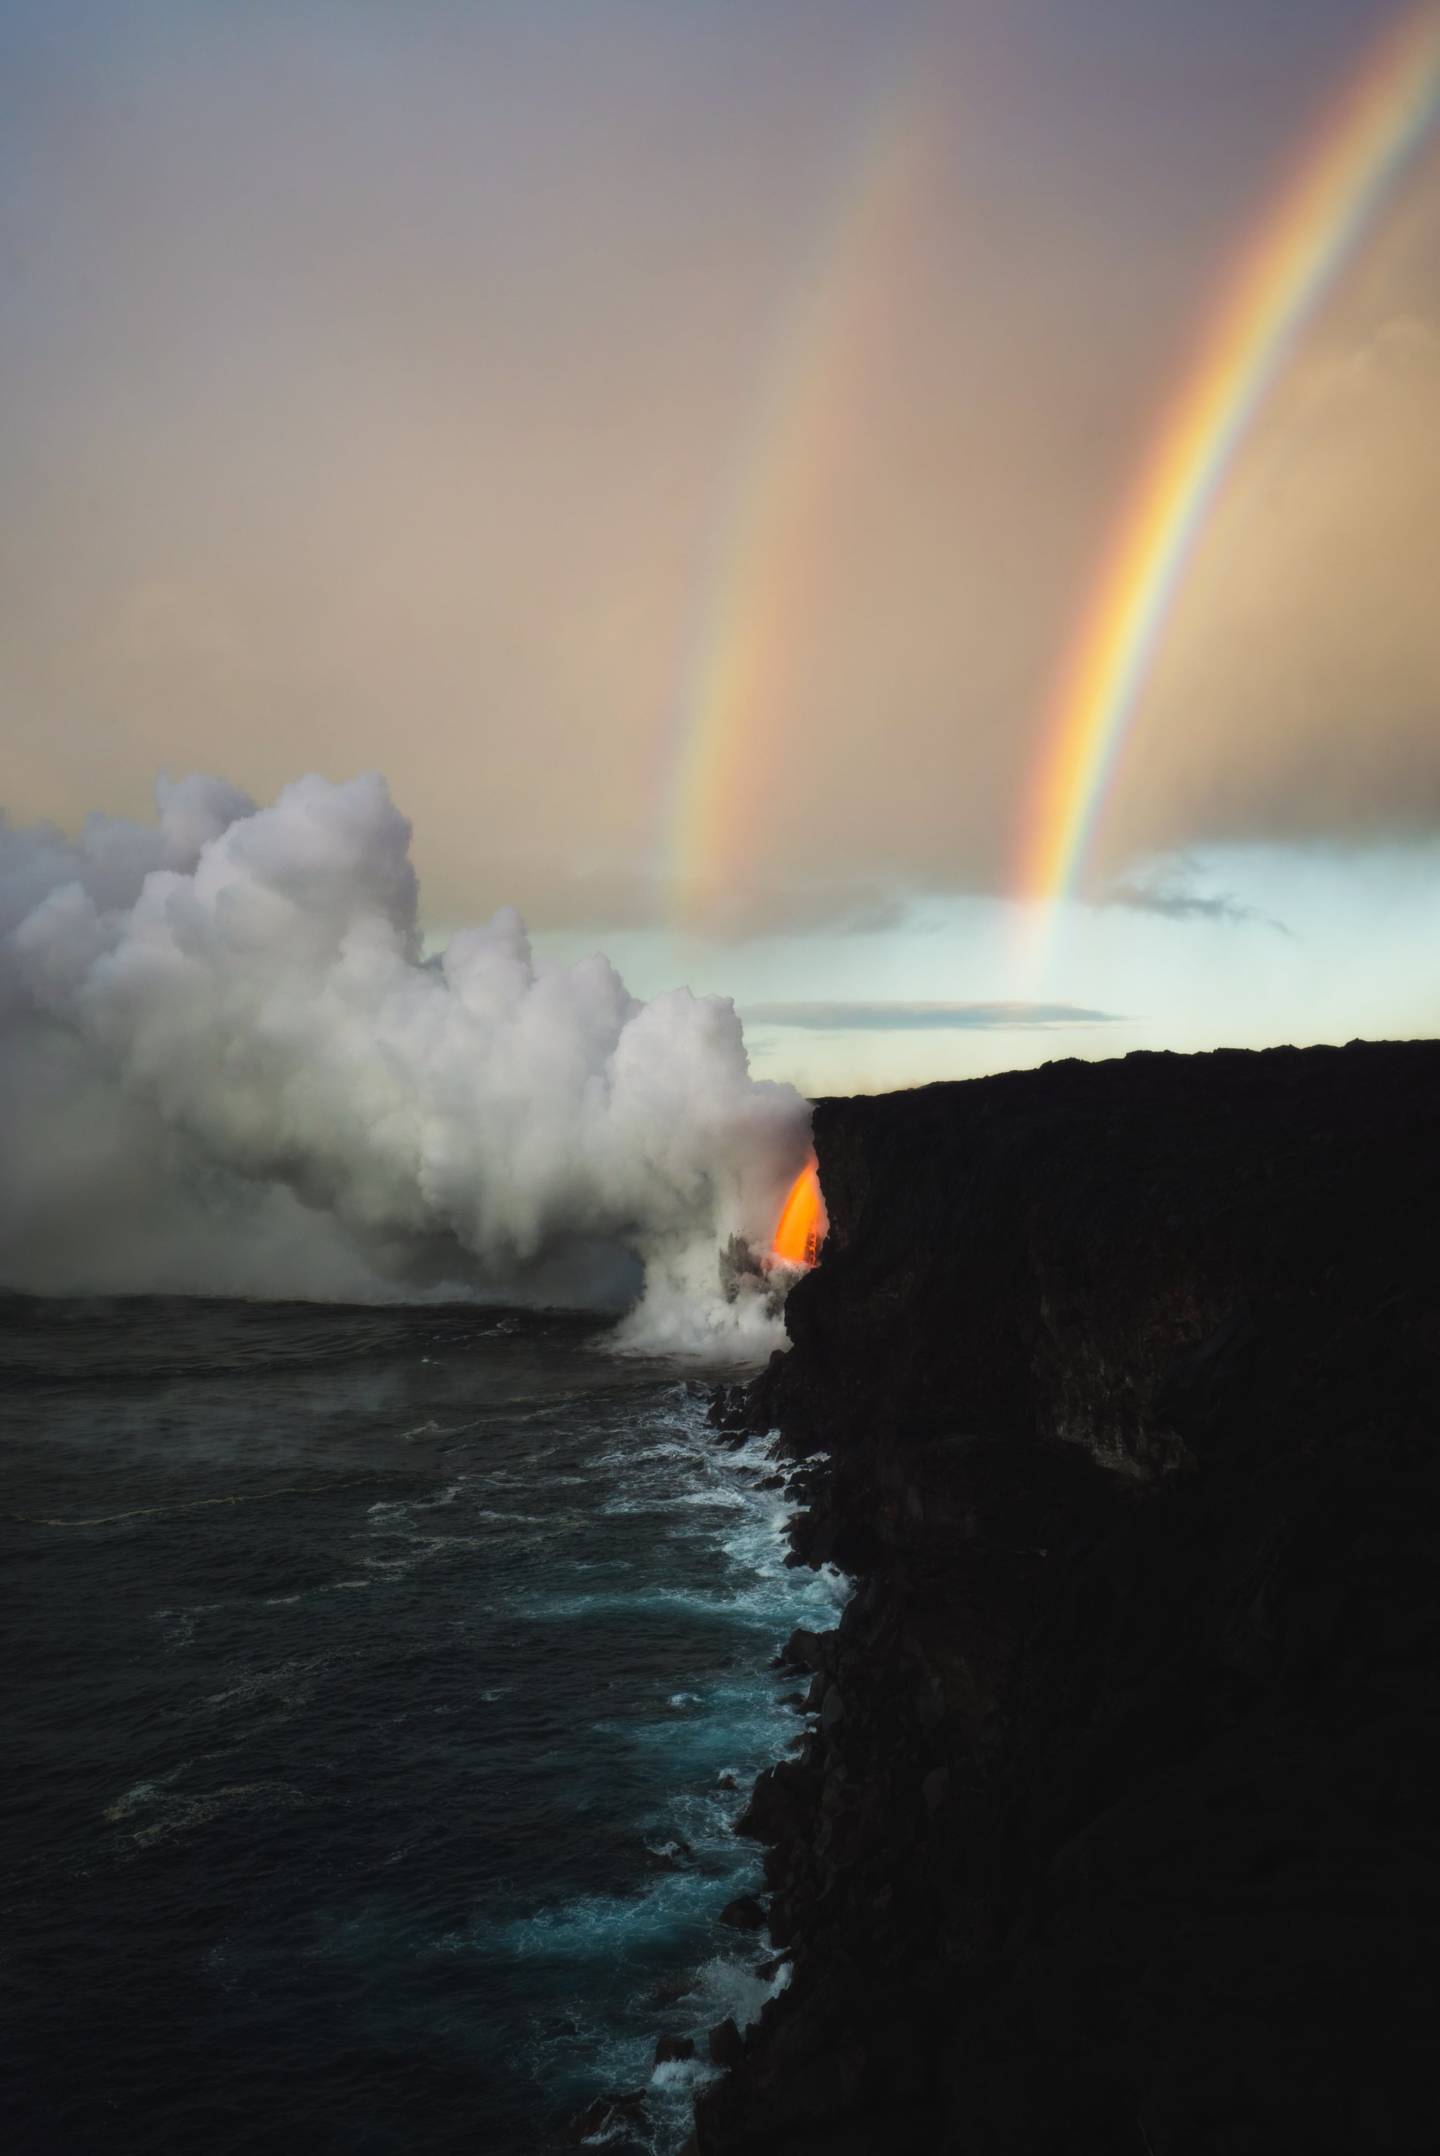

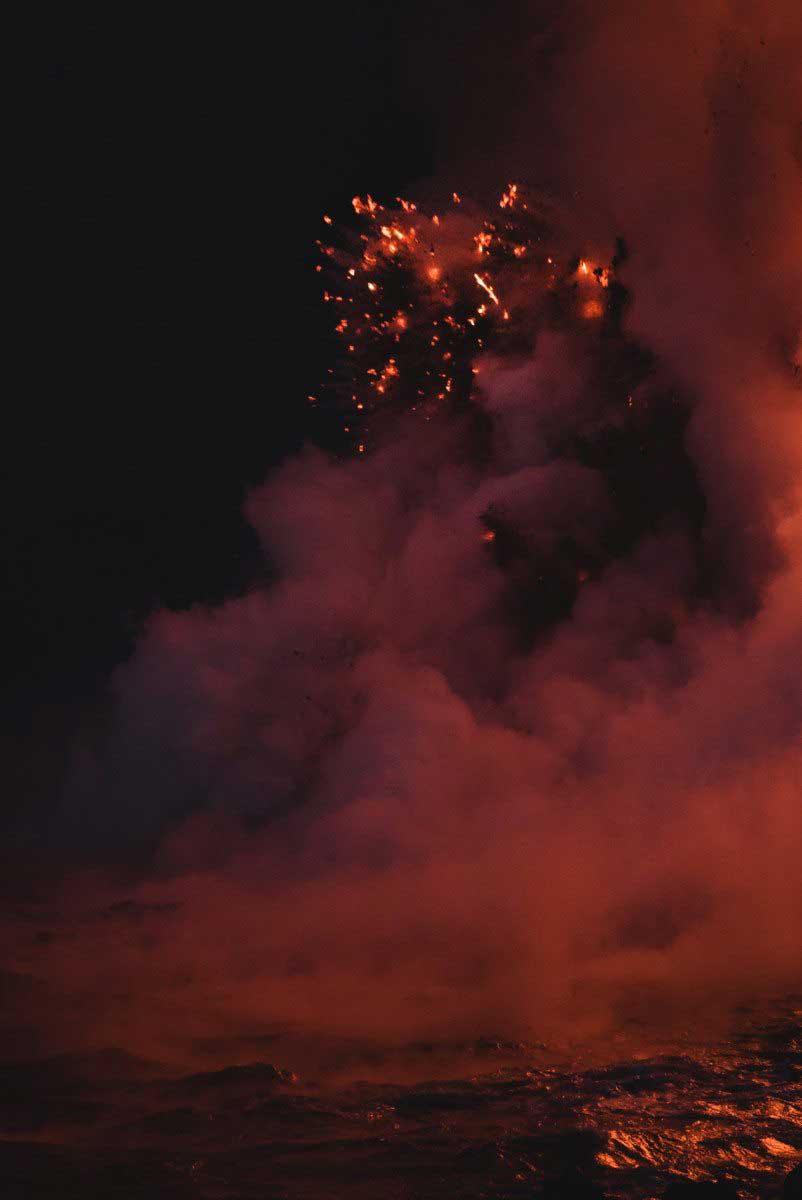
One of my favorite moments on our trip was when two rainbows formed right over the lava spout. They ended up lasting for nearly ten minutes! I really appreciated the juxtaposition of the dramatic explosions and peaceful rainbows. It was such an incredible moment to witness! I felt so lucky to be in the right place, at the right time with my camera.

I especially loved watching the newly formed lava rock shoot high into the sky and collide with the water creating splashes. This happened every few seconds but never got old to photograph!
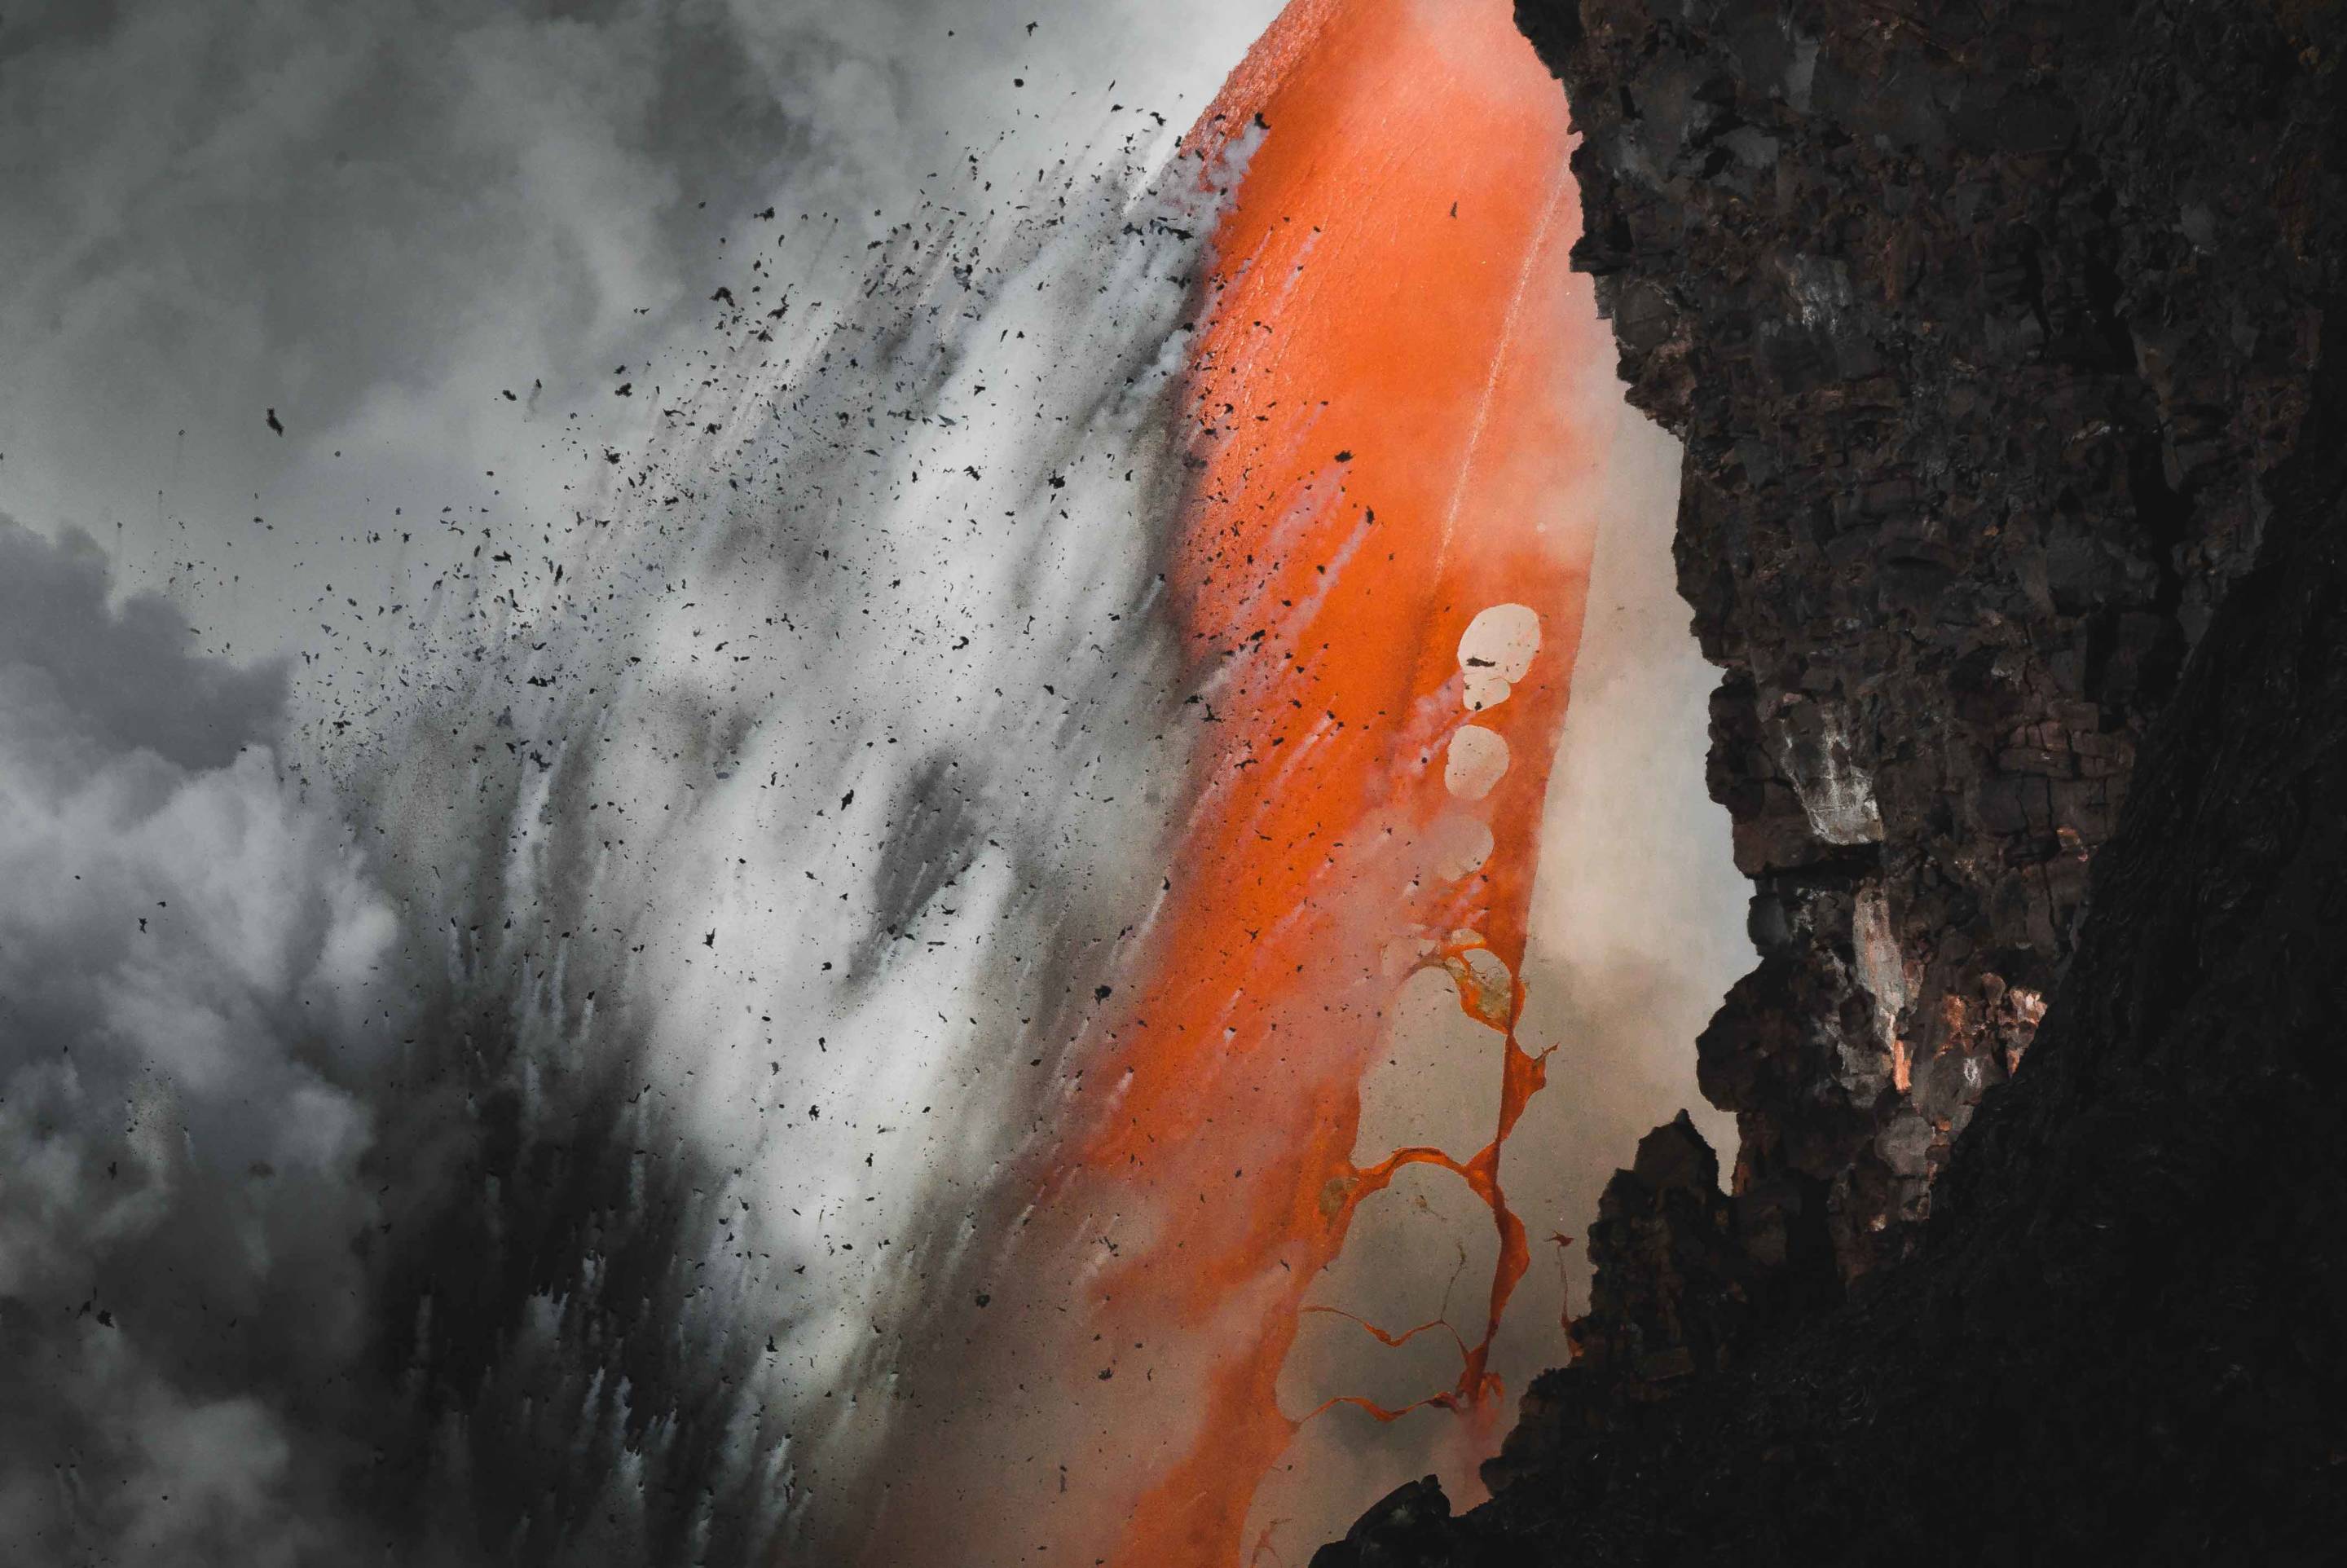
Because the safety of the viewing area so far away, I relied on telephoto lenses while photographing the lava. I used my Sony 70-200mm f/4 lens on my Sony A7Sii as well as a Sigma 150-600mm lens that CJ was kind enough to loan me.
Overall, I had mixed feelings about photographing the lava. Personally, I wish I focused on shooting more video because I felt that when it came to the images, there was a lack of much needed scale and context. When posting the volcano images on social media, I received quite a few comments about how the images looked like abstract paintings. I feel like it was very difficult to truly convey the extreme power and size of the lava spout and explosions.
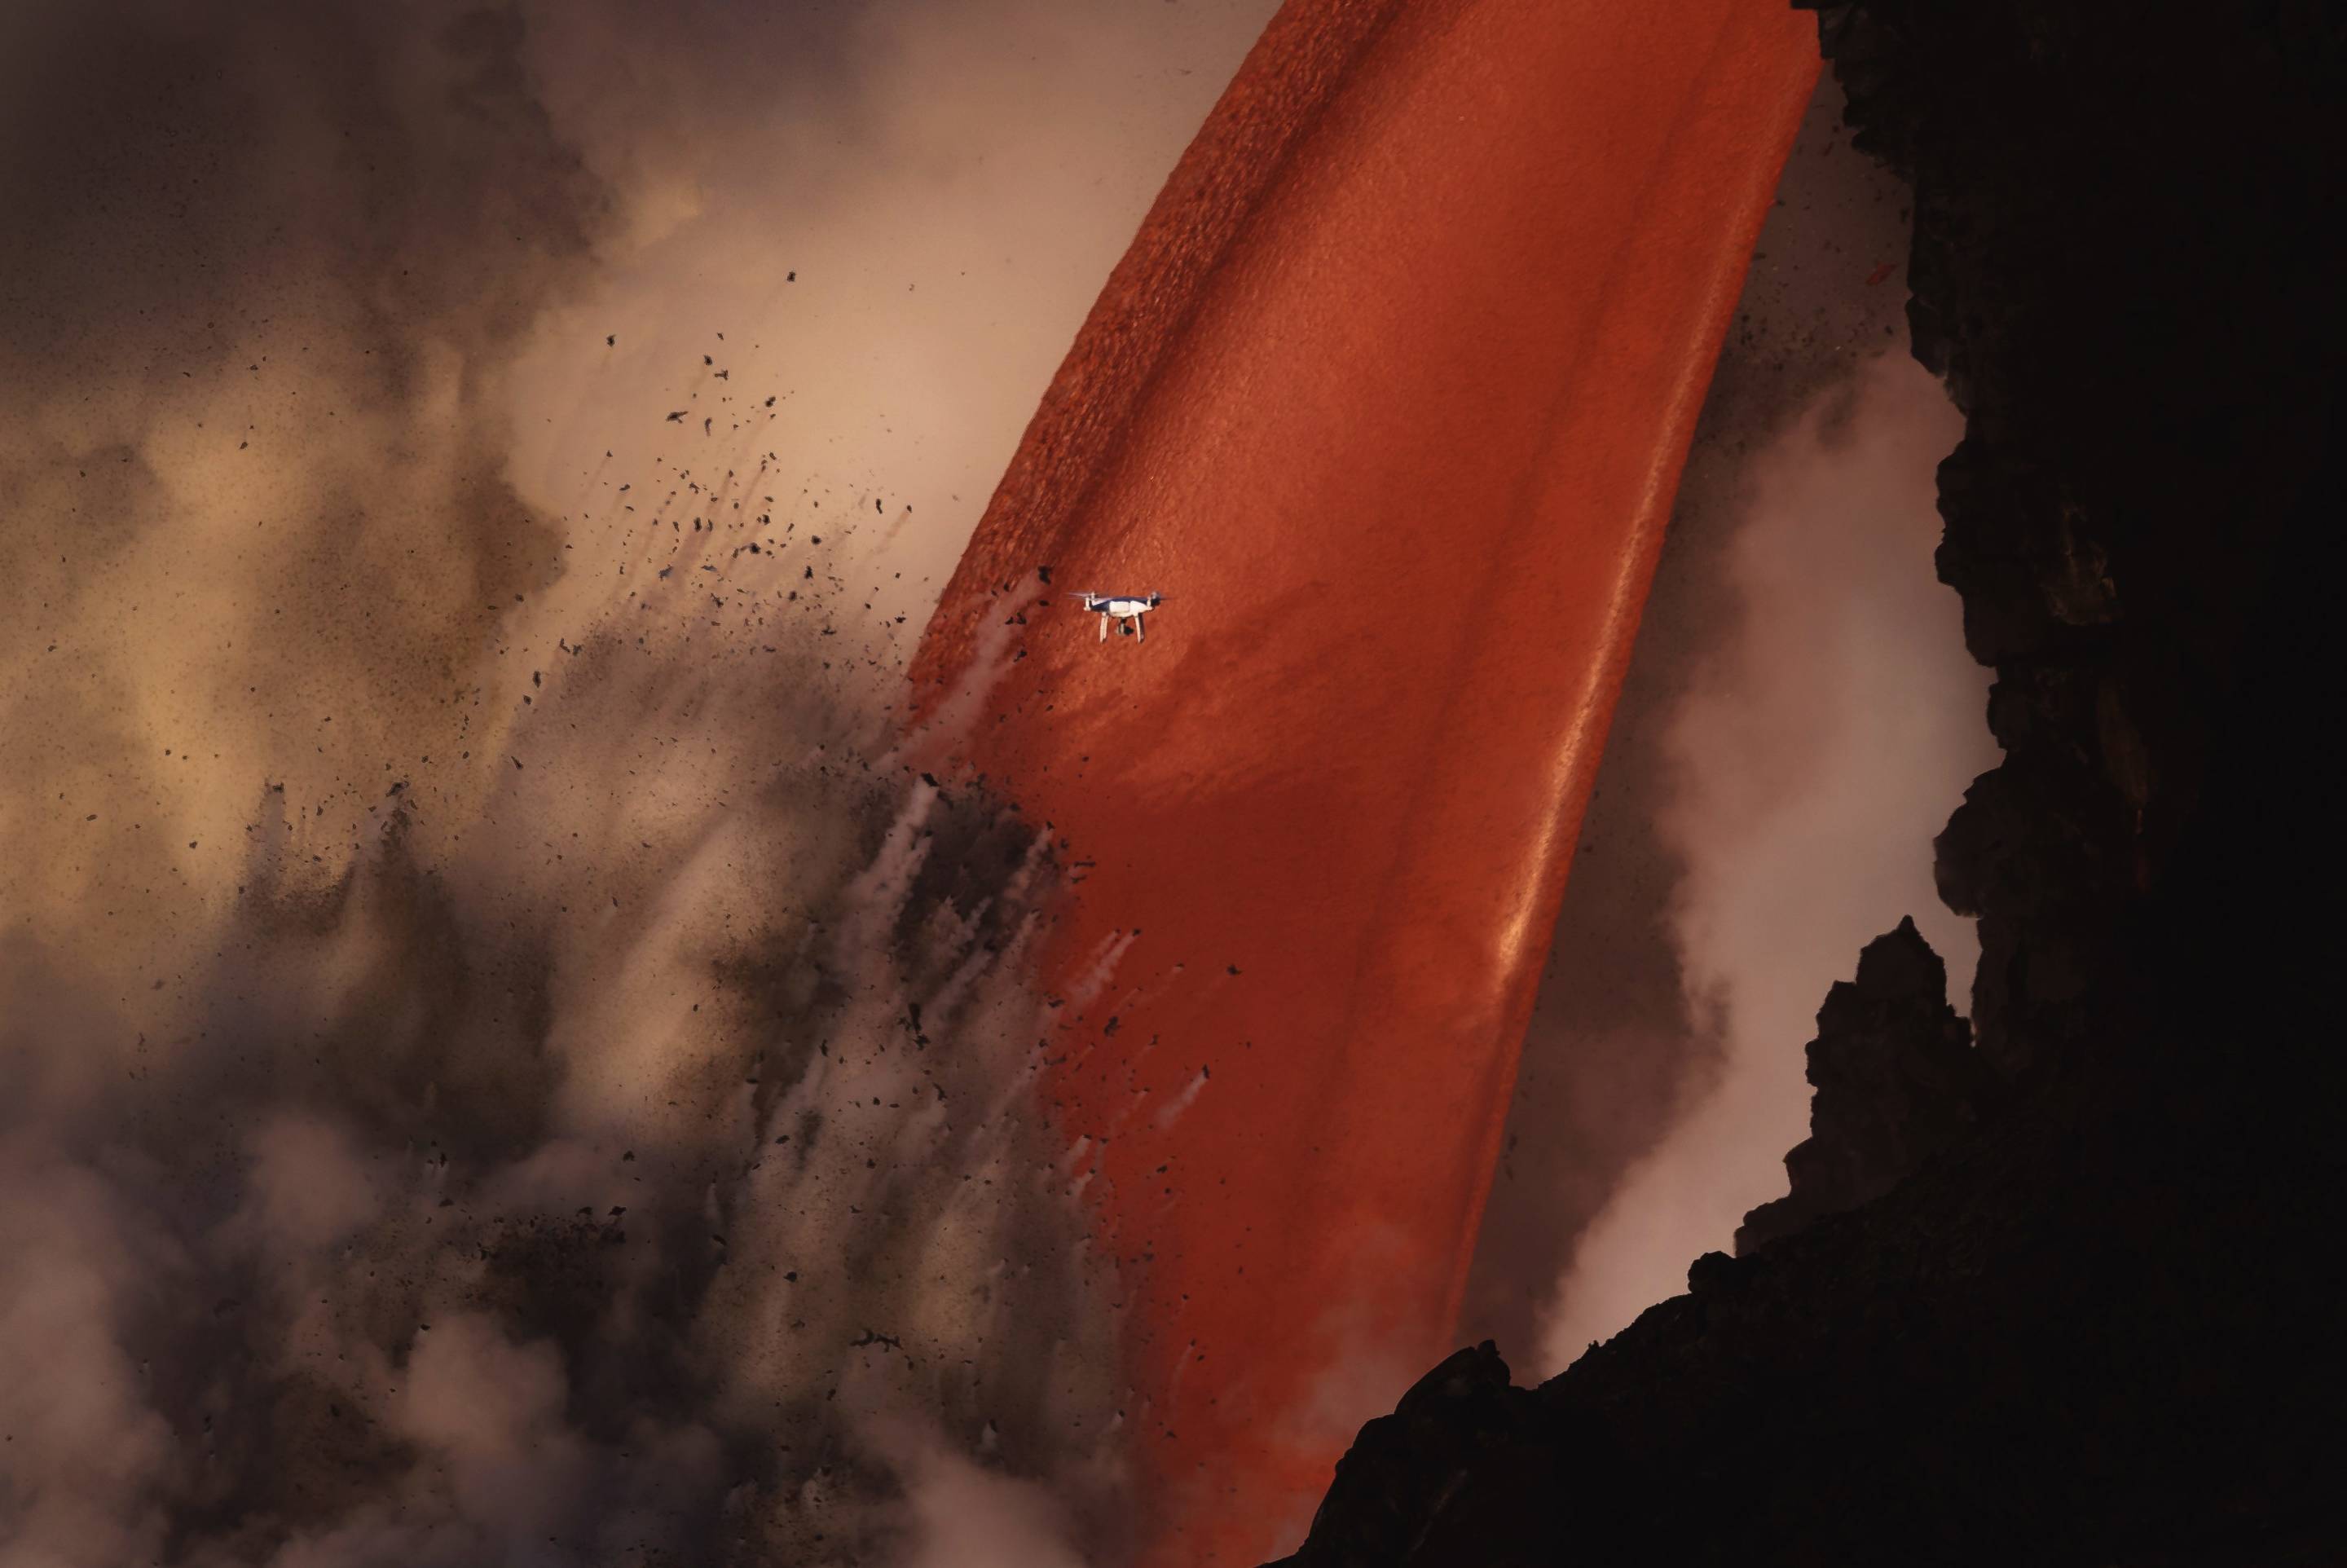
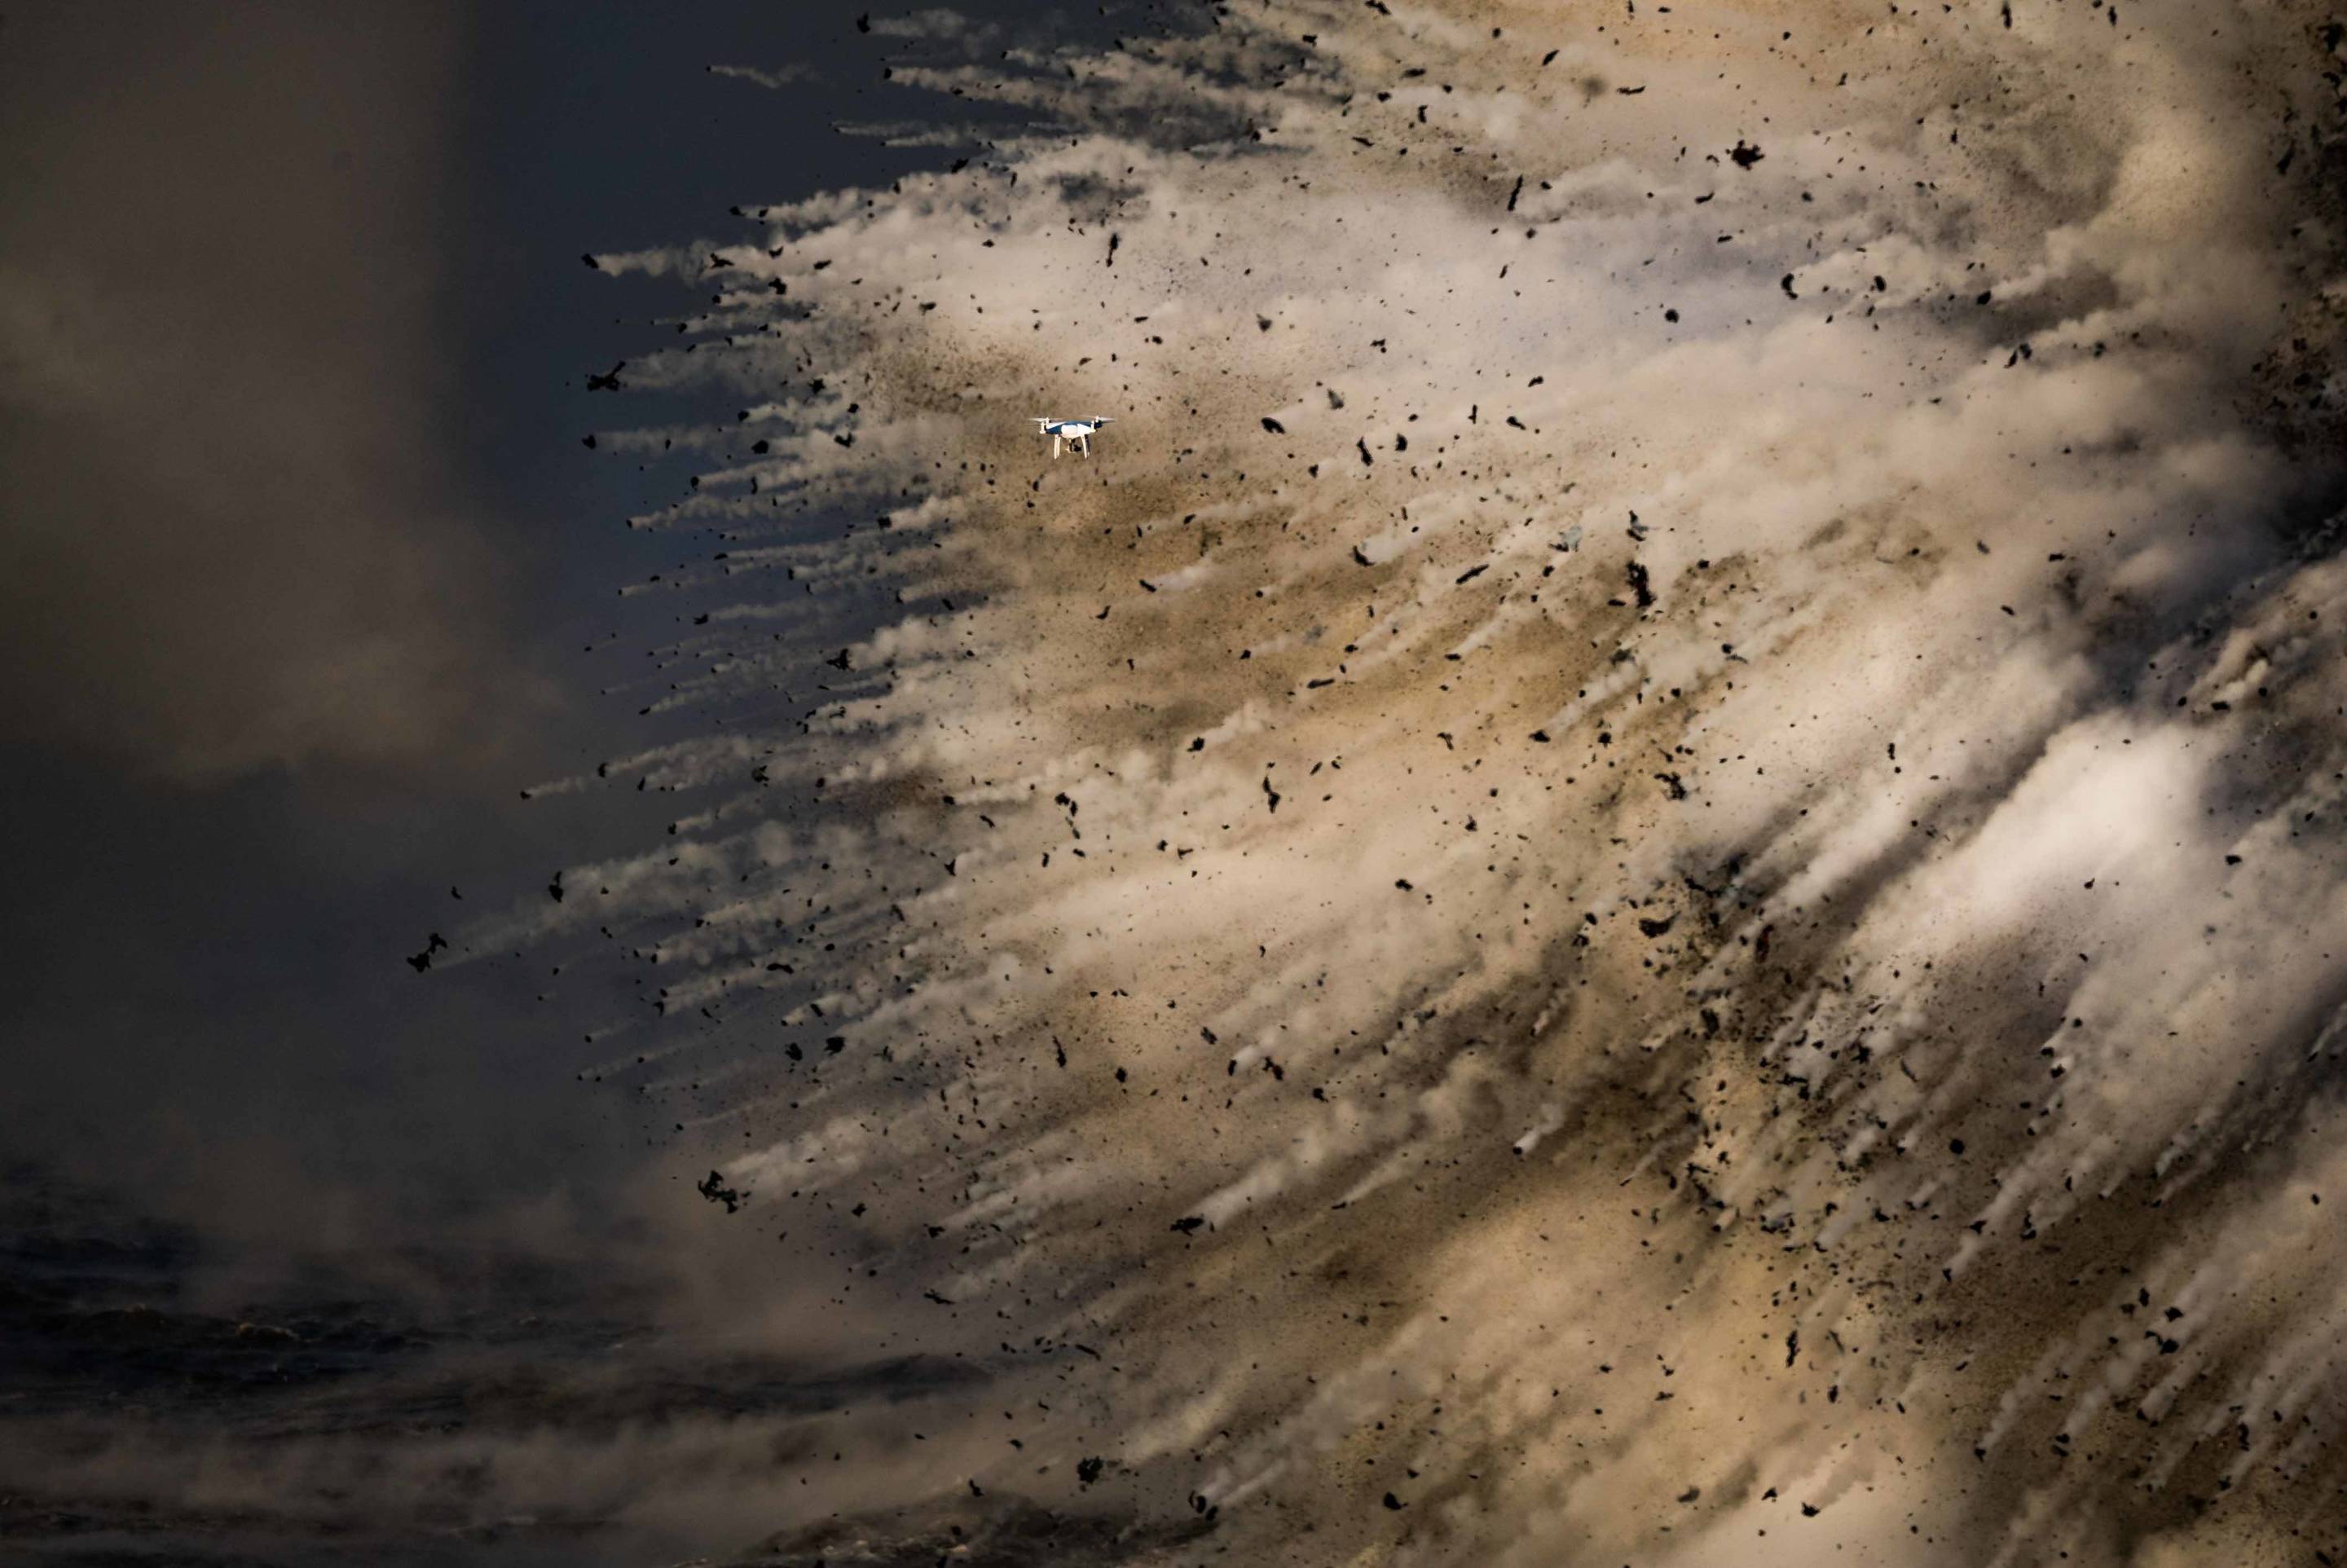
On one morning, someone flew their drone towards the lava providing an opportunity to show scale. Because of the compression of a telephoto lens, the drone in this photo is actually a lot further away from the action than it appears to be but I like it because it comes close to showing how massive the explosions are. I would like to make a note that in most cases, it’s illegal to fly a drone in National Parks.
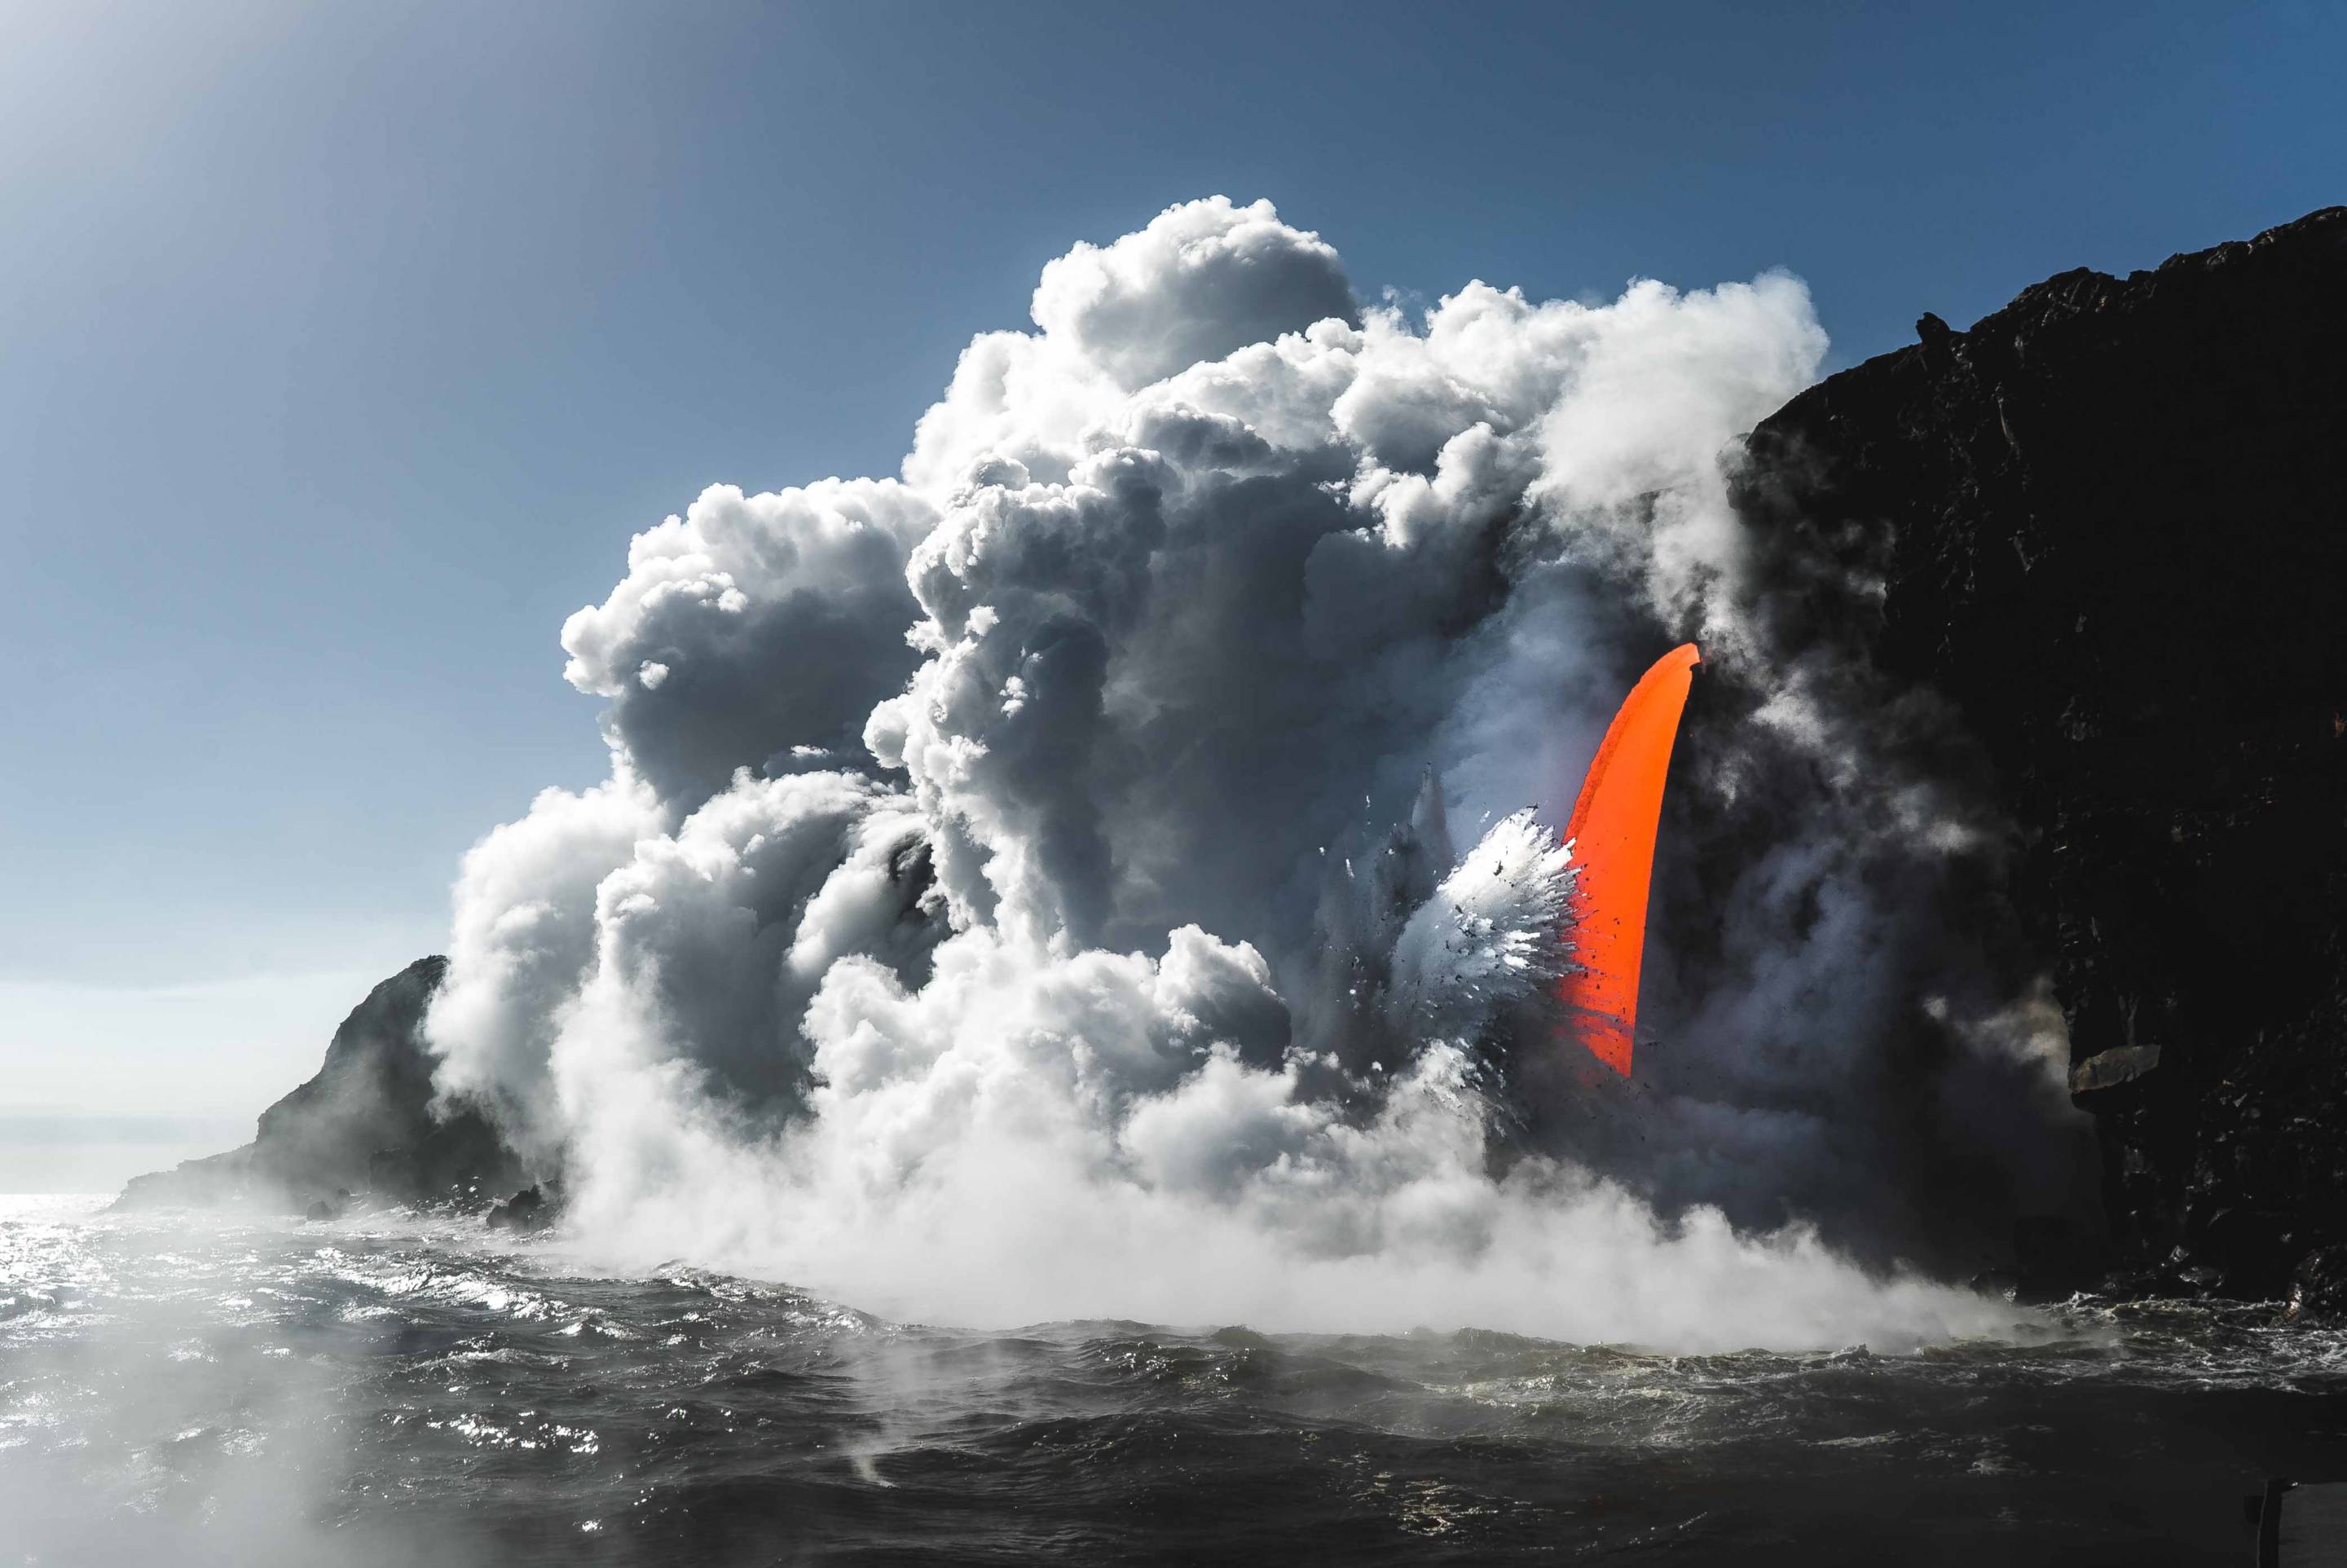
On our final afternoon, we took a boat ride out with Captain Shane Turpin of Lava Ocean Tours. On the boat, we were able to get much closer to where the lava poured into the ocean and photograph the lava spout using our wide angle lenses. Being within the hot steam and so close to the explosions was so exhilarating!
I think that visiting Kilauea Volcano should be on everyone’s bucket list. When you visit, please be sure to do so safely. There are so many ways to hurt yourself or die when out near the lava spout so educate yourself before you go!
Thanks so much for taking a minute to read through this short photo essay. I feel so fortunate to have been able to experience and capture the lava tube and hope to visit again, soon!
Oneonta Gorge Ice Adventure
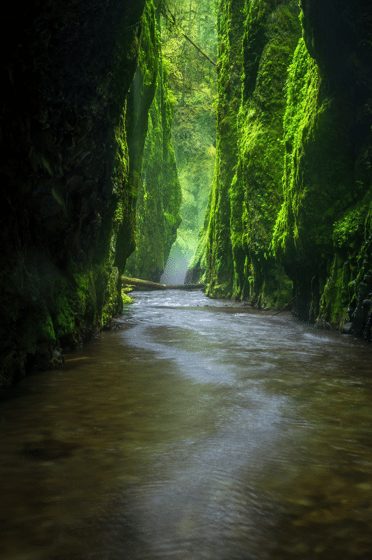
As an Oregonian, I’m extremely fortunate to live in such a lush and beautiful part of the country. It seems that we have nearly unlimited access to waterfalls and unique river areas. Located just under an hour away from downtown Portland, Oneonta Gorge is one of my favorite spots to not only photograph but also relax at and enjoy on a hot day. With a river flowing amongst it’s beautiful, mossy walls leading to a waterfall, it has also quickly become a global hotspot for not only photographers but as well as for tourists and locals.
Unfortunately, social media has taken it’s toll at Oneonta Gorge so much that even early morning on a summer day there can be hundreds of people squeezing through the channel, thus creating a congested and slightly unpleasant outdoor experience.

While it’s unarguably stunning, as a local photographer, the allure of Oneonta has certainly begun to wear off. Some would say that the Gorge has now become nearly ‘overshot.’ That being said, this past winter I was able to experience it in entirely new conditions and for the first time in a while, felt inspired to revisit it with my camera.
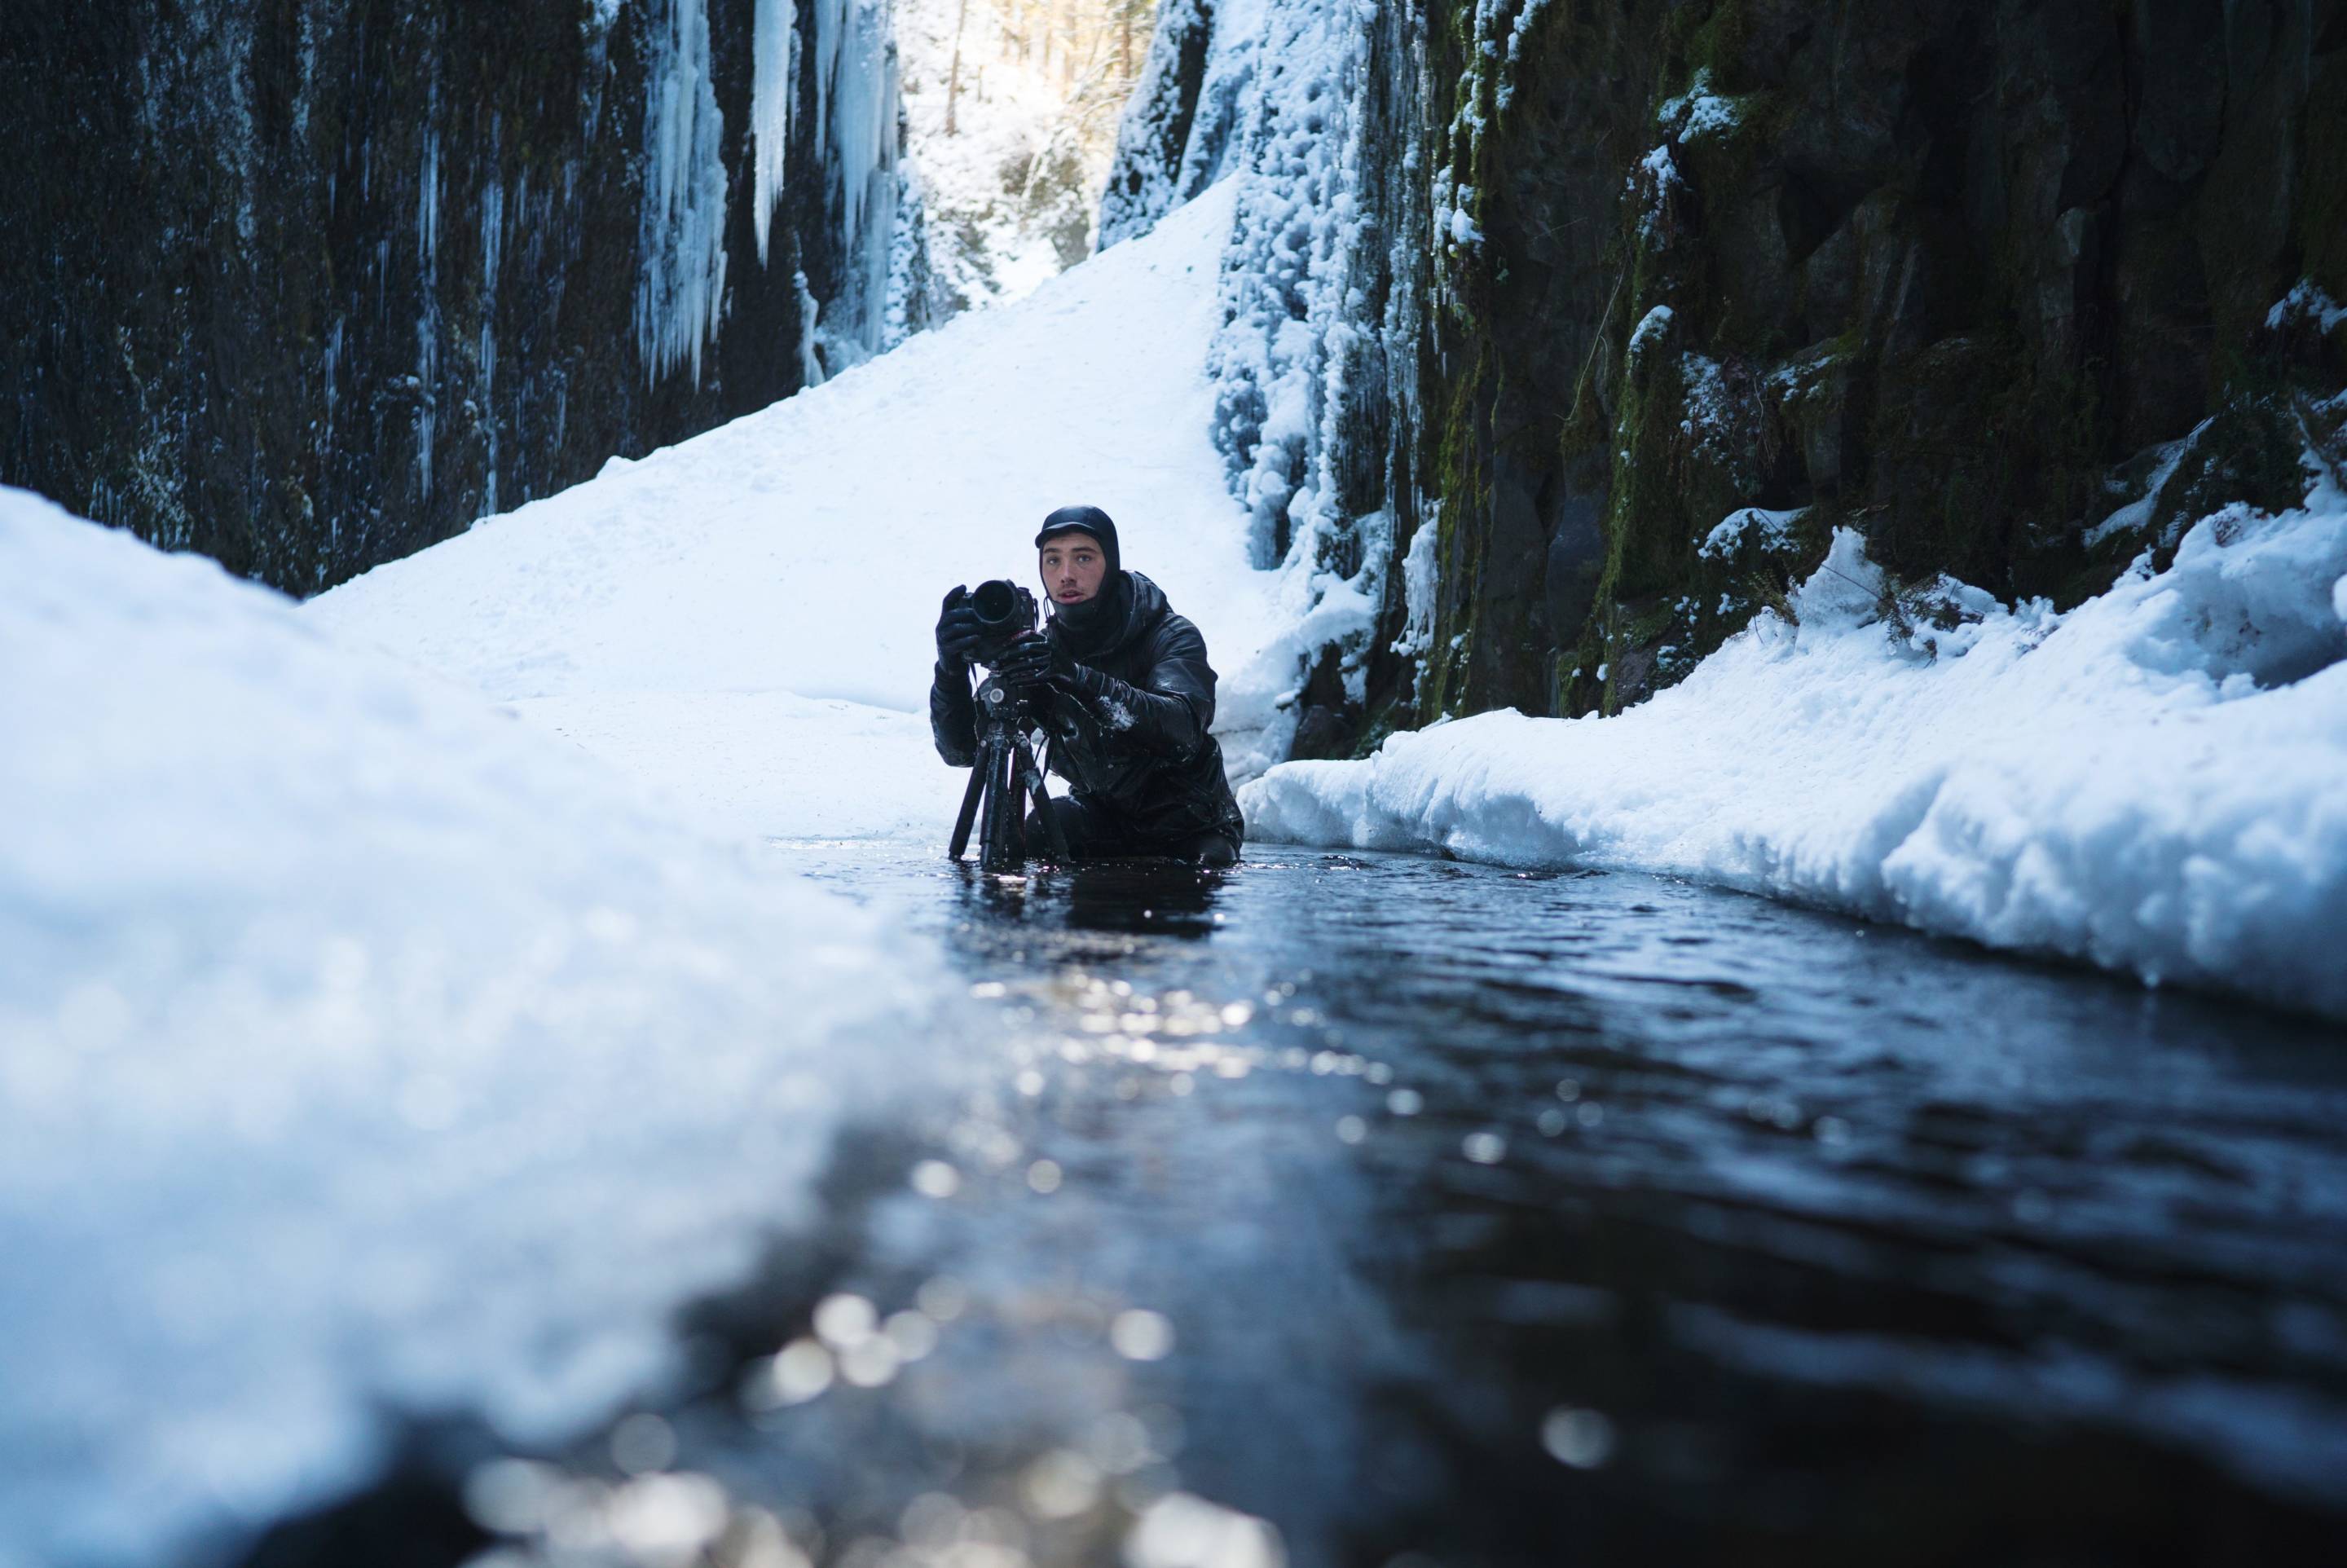
After a week of frigid cold temperatures, many of the waterfalls in the Columbia River Gorge began to freeze over. Curious what Oneonta Gorge might look like, myself and some other photographer friends threw on our chest waders and wetsuits and made our way into the Gorge.
When we got down to the river to begin the hike, we were blown away at how frozen the river had actually become. It ended up being completely frozen and for the most part, we were able to walk over the river only occasionallybreaking through the ice and falling into the water below. Thankfully, we all were well prepared with chest waders and wetsuits so this wasn’t an issue and we made our way through the ice with confidence, at times using our tripods as support.
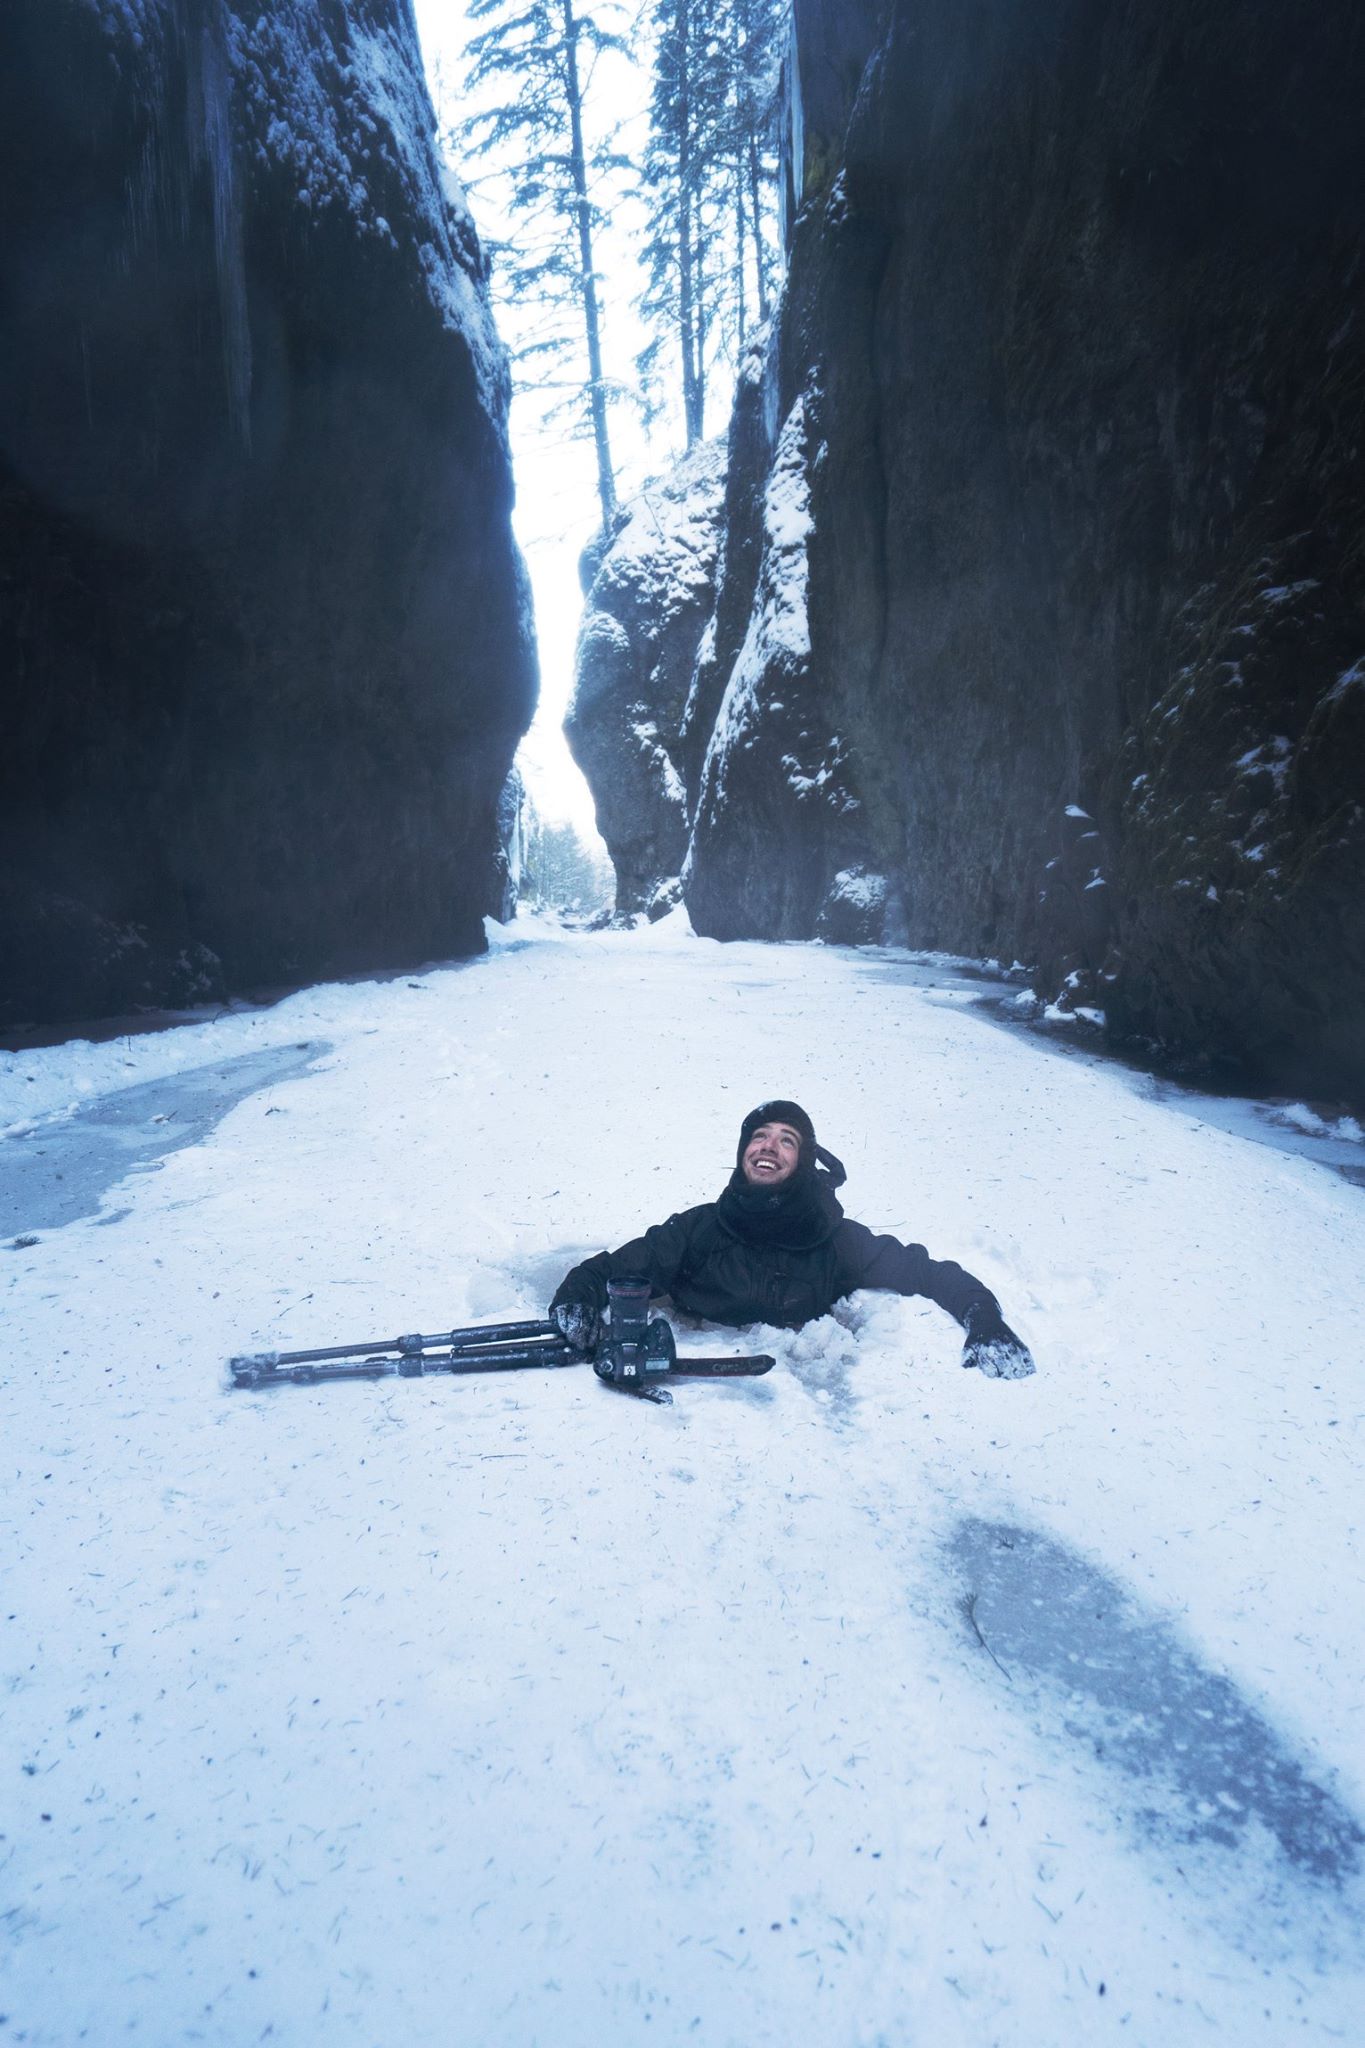
While walking through the entirely frozen gorge was surreal, I was slightly disappointed. Before arriving at Oneonta, I envisioned shooting a long exposure image of the water flowing through the gorge surrounded by ice but because it was nearly entirely frozen, I was unable to do that except for a few points in the gorge that didn’t work out compositionally.
As we continued through the gorge, we made it to the waterfall. When we arrived, we realized that we were standing on a bed of ice that stood 10 or so feet higher than the river was. For the next thirty minutes or so, we shot the waterfall until we felt our creative options felt exhausted.
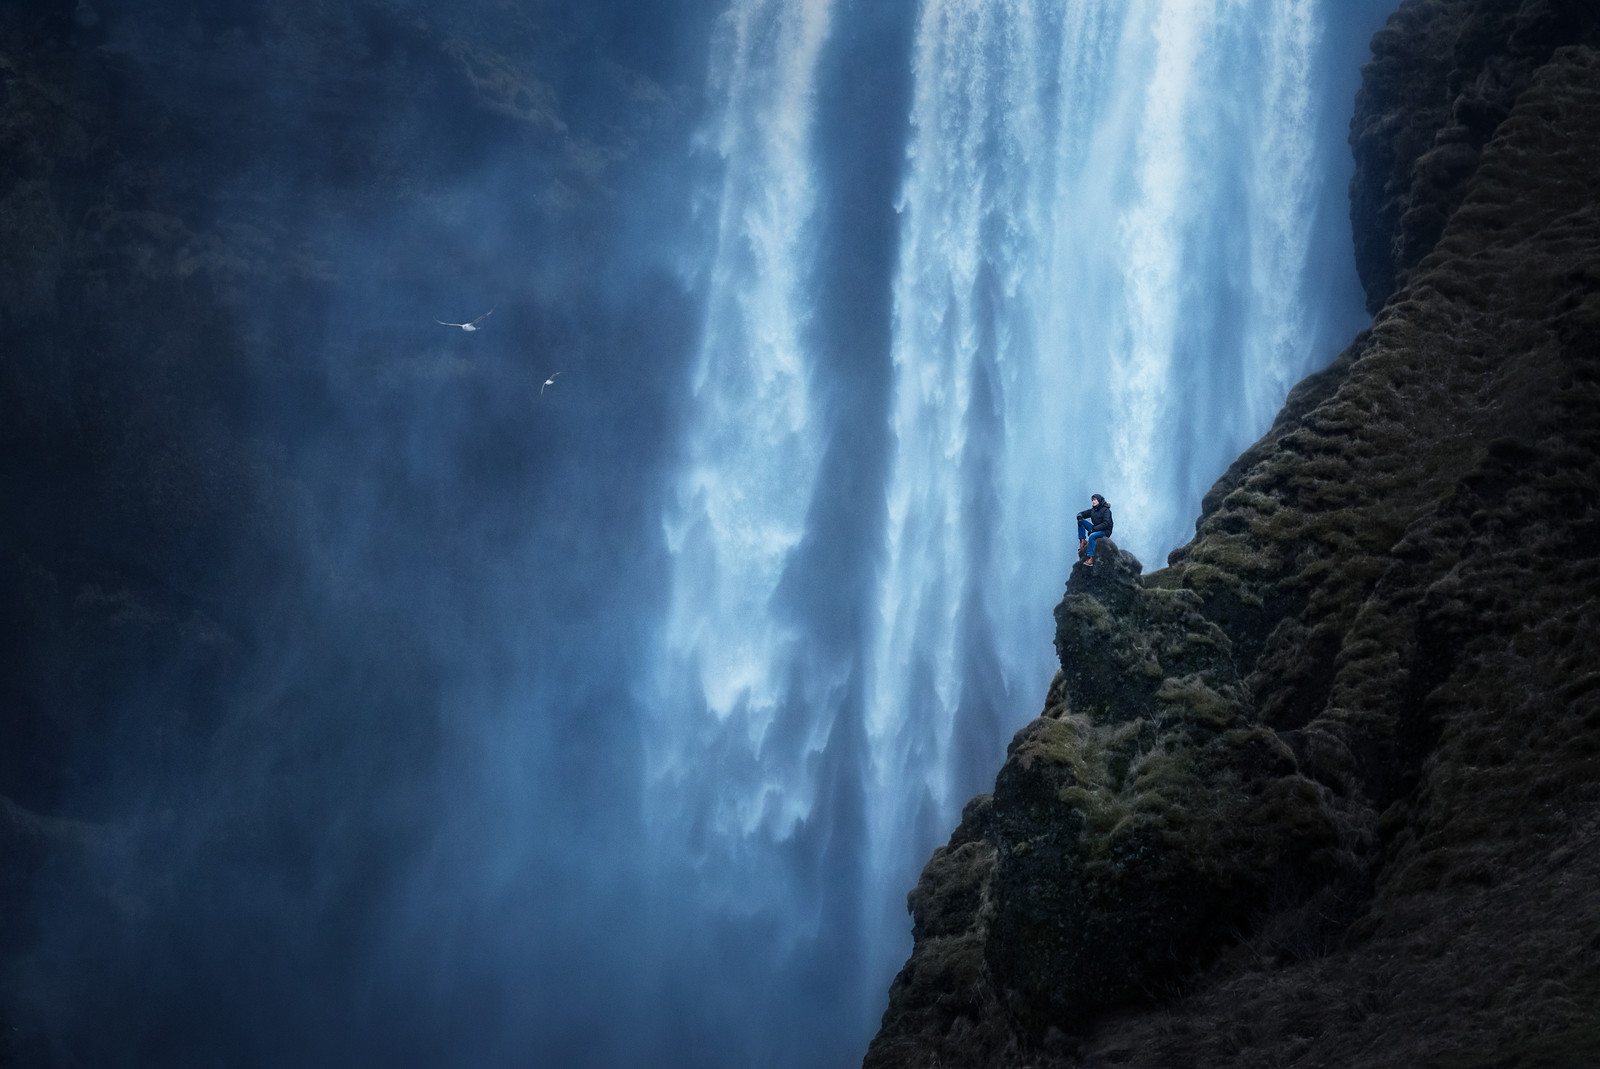
In search of a new perspective, My friend Ben Canales braved his way below the ice and we ended up finding a hole that framed the ice. I collapsed my CLT 104 tripod till it was as small as it would go and carefully composed my shot using the hanging icicles to frame the waterfall as well as a fallen icicle as a lead-in to the scene. There was an insane amount of spray from the waterfall and any moisture that landed on the lens would almost immediately freeze. After continually wiping and attempting to thaw the lens, I ended up with a frame that was fairly clean of moisture.

In the end, I didn’t photograph what I initially had in mind but I walked away with a photo that I was proud of and could only have been captured that day. Soon it will be summer and the crowds will return to Oneonta Gorge but I’ll always remember what it was like to walk through the ice and photograph it during such unique conditions.
Incorporating the human element into landscape images
Since entering the world of landscape Photography in 2013, I’ve become fascinated with the human element and how it not only provides a needed sense of scale but how it also strengthens a viewer’s connection to an image. Over the past year or so, I’ve put together a ‘People In Nature’ collection. I’m very proud of many of the images in the collection and I’ve really enjoyed using Induro Tripods while creating the series. Having a high quality and reliable tripod/ball head from Induro was essential for me to get the shots in this series. In this blog post, I’ve included images from my ‘People In Nature’ series and some behind the scenes informationals on how each image was captured.
Because the entire image consisted of several layers that were later blended together, I relied on the consistency and stability of the CLT 404.
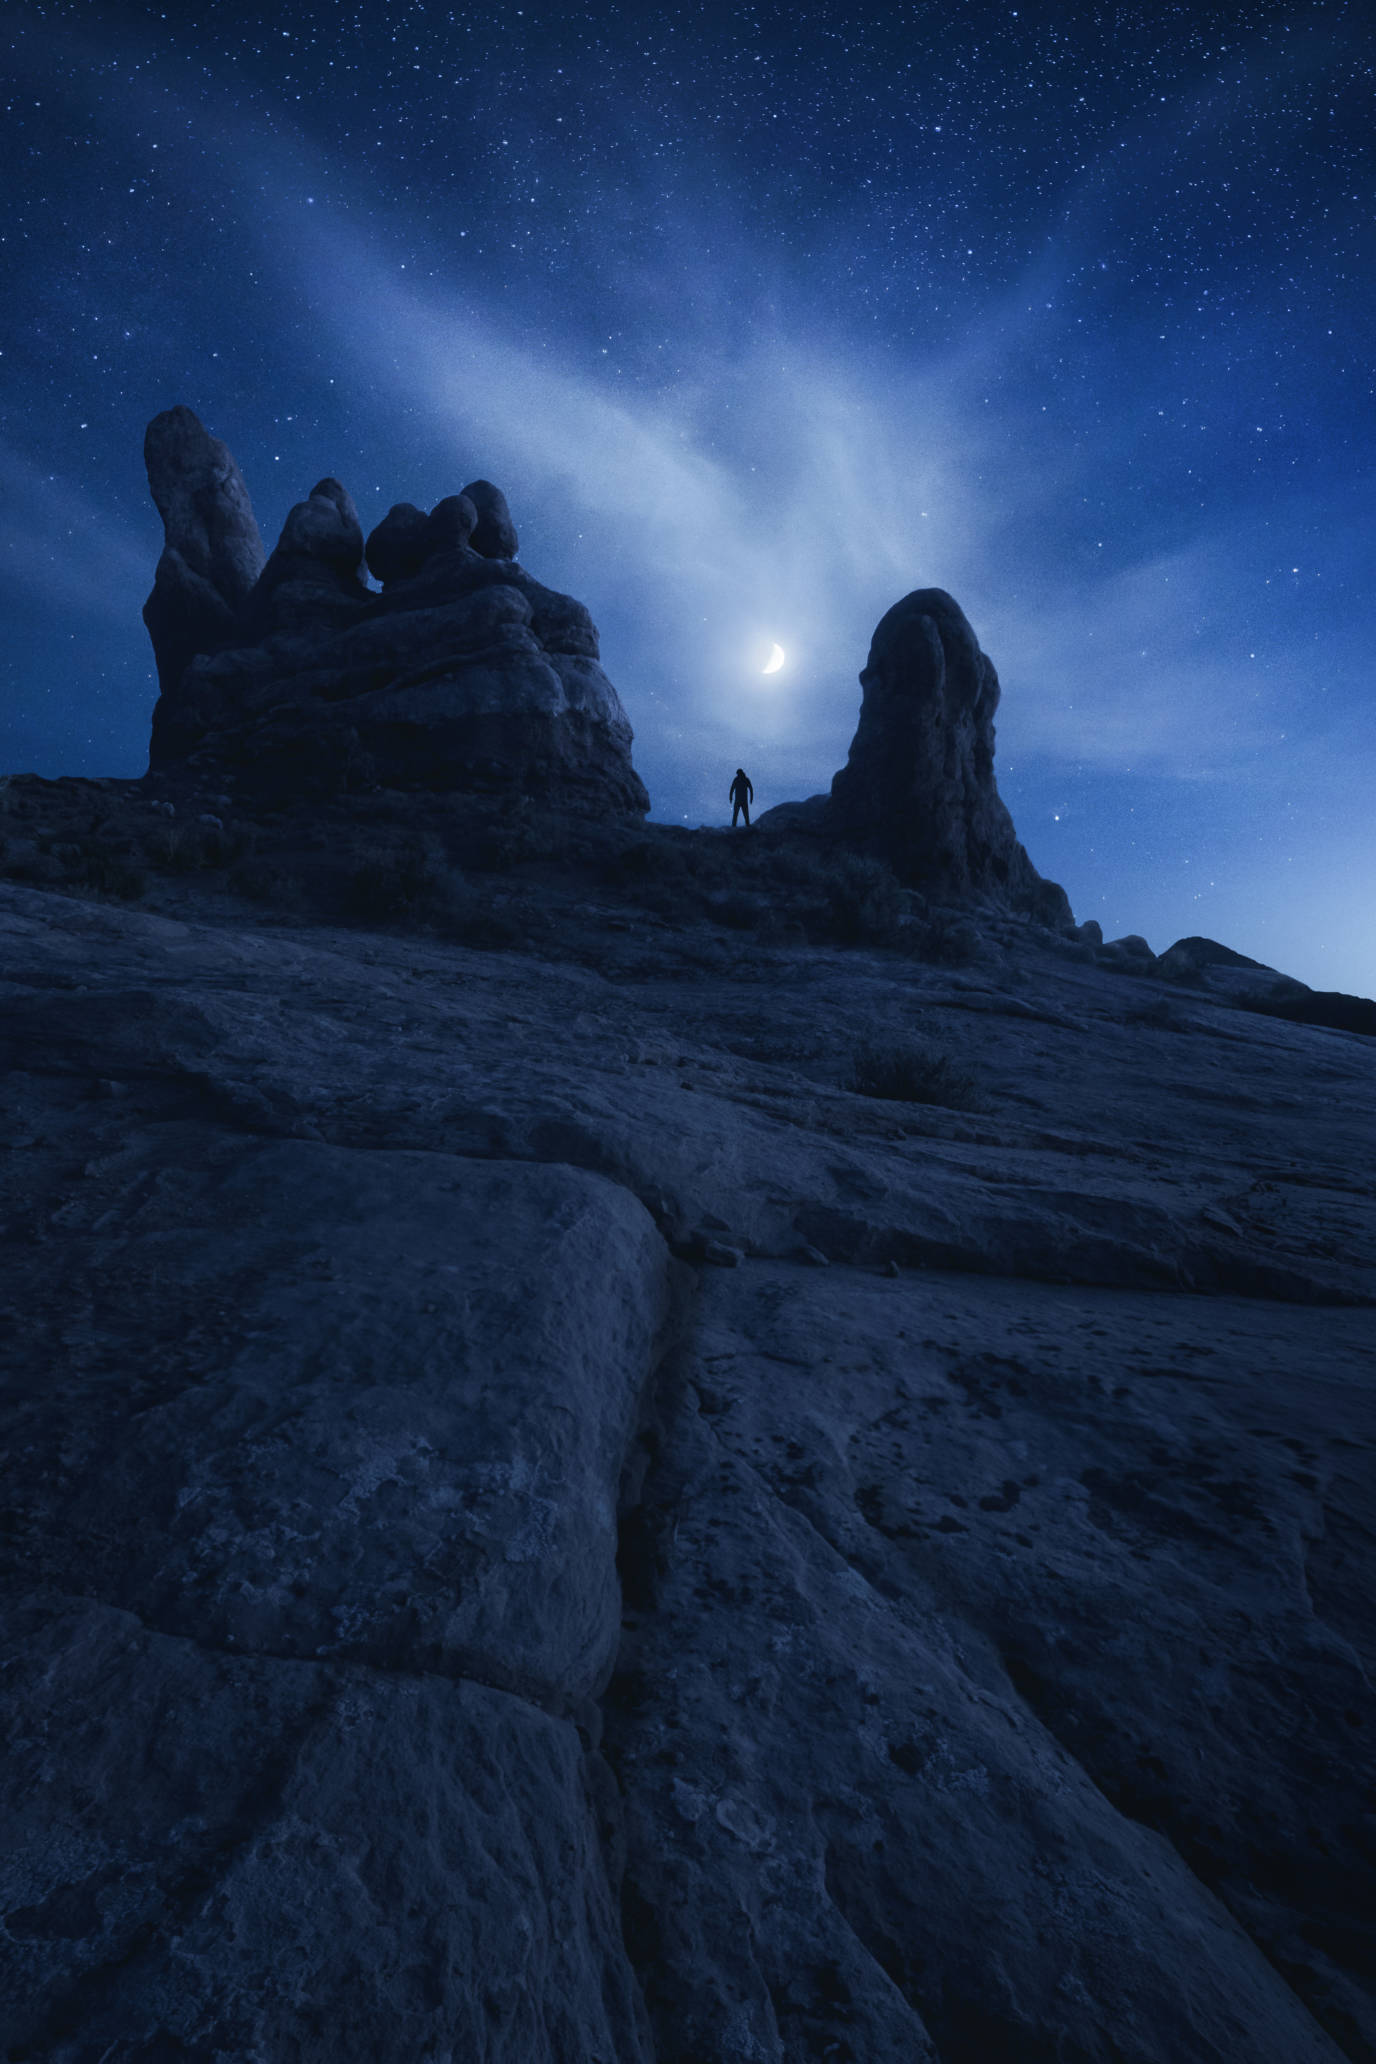
For this image, I began capturing two blue hour foreground shots at different focus points for maximum sharpness. Without moving the tripod, I then connected my intervalometer remote to my camera and went out near the rock formation for the ‘person layer.’ After that I waited an hour or so for the moon to get into the position I liked and took the sky layer.
While it’s certainly uncommon to photograph the Milkyway with a moon out, this image is one of my favorites from the series.
Because it was so dark out, I relied on my BHD1 Ball Head to precisely pinpoint and adjust my composition to involve the leading line coming from the bottom left edge of frame.
Once I had my composition set, I locked up the ball head and focused stacked to retain detail in the textures. After that, I shot a layer of my friend Kevin who climbed up below the milky way.
Because the moon was quickly rising, the stars began to fade so having a reliable tripod and ballhead was essential for me to capture what I envisioned for this image.
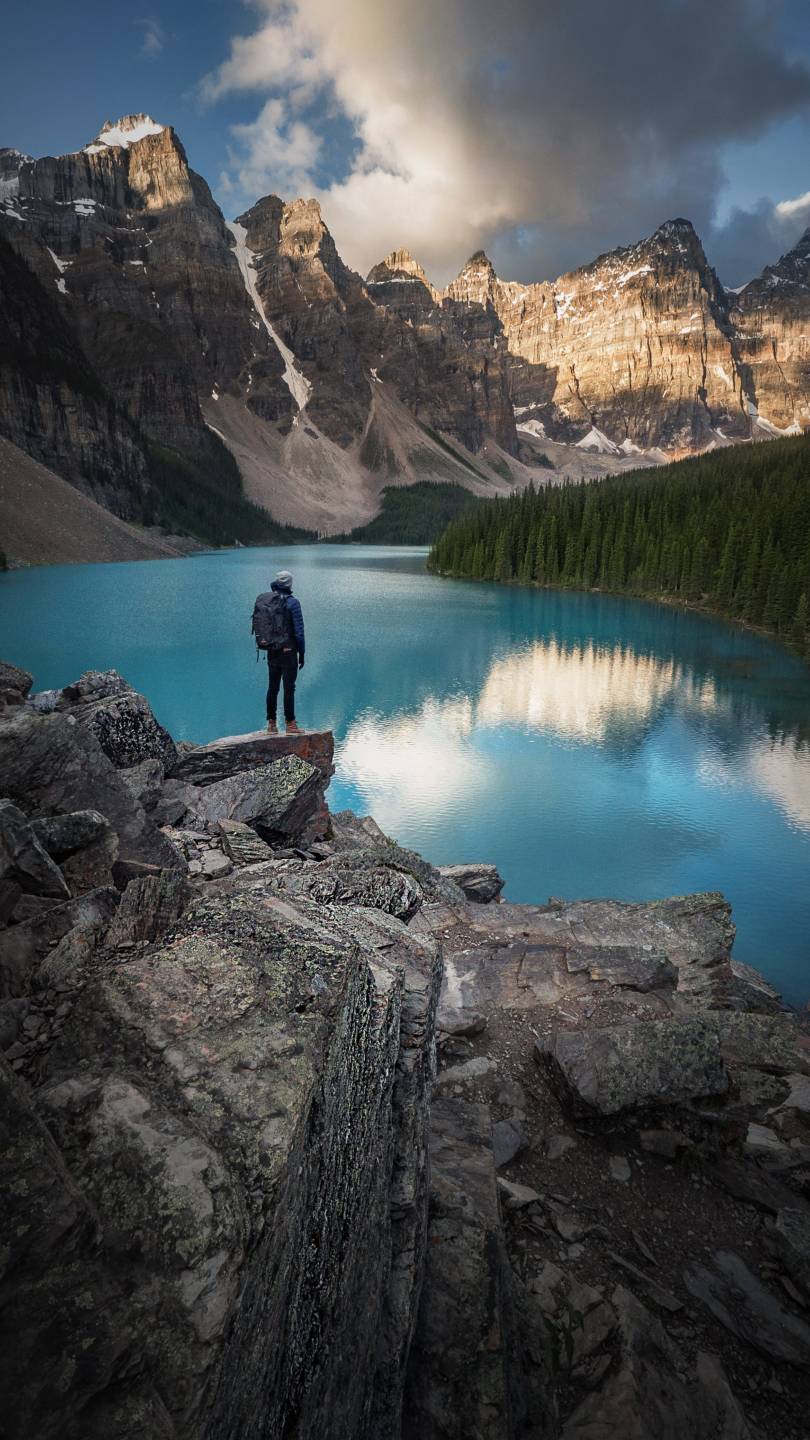
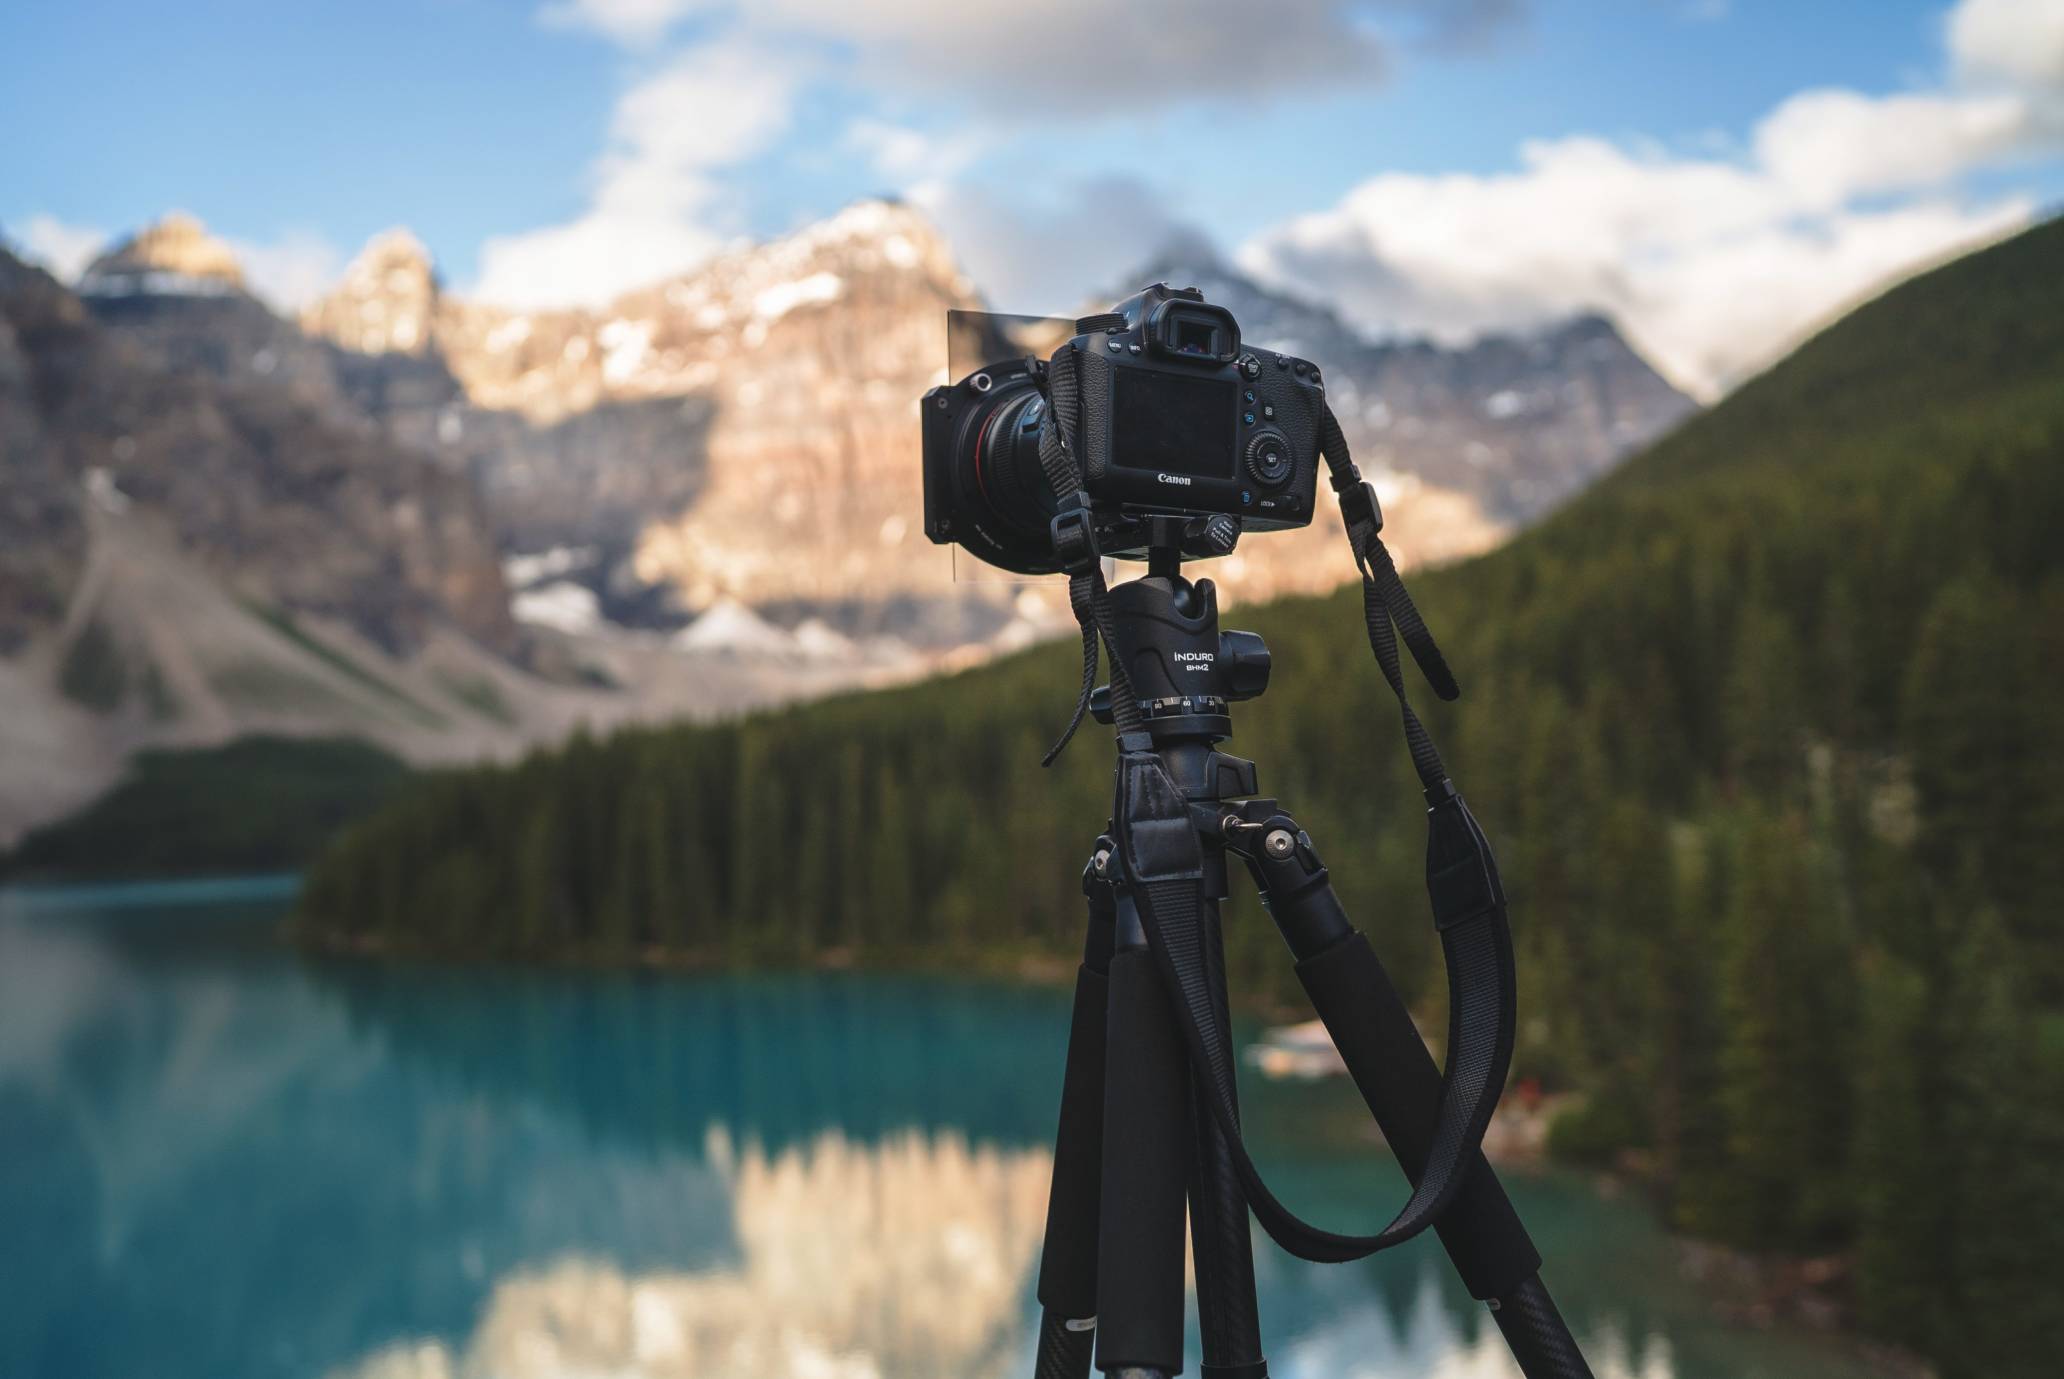
Finally, this image was taken at Moraine Lake during sunrise in the Canadian Rockies. To capture this image, I put on a Gradient ND Filter by Vu Filtersand set my intervalometer remote to take photos every three seconds. As the camera was automatically taking photos on my CLT 204, I climbed out to the rock and tried a variety of ‘poses’ / positions. Because I couldn’t quite see what they looked like from the camera, it was really helpful to take multiple images so that I could find one that worked well with my composition.
I hope you enjoyed the series and the ‘behind the scenes’ informationals.
Portraits of a mountain
Why a Quality Tripod is Essential
While it’s fairly common knowledge that the state of Oregon is most known for being home to a majority of the country’s most beautiful waterfalls, Oregon’s mountains are what inspire me the most--specifically, Mount Hood.

Standing at 11,250 feet, Hood one of Oregon’s largest mountains and in my opinion, the most photogenic. Surrounded by several lakes, peaks and rivers, it’s hard to grow bored shooting such a beautiful and iconic landscape. I’ve spent the past three years shooting Mount Hood from a variety of locations in many different types of conditions.
Many of my favorite images of Mount Hood have been shot at a peak near Hood called TDH located above Mirror Lake on Hood’s southern side. While the view from TDH is in my opinion, the most impressive viewpoint of Mount Hood, it’s certainly not a place you can just drive up to and walk out. To get to TDH, it’s a nearly six mile, roundtrip, vertical climb that often requires snowshoes and even sometimes the general ‘know how’ to reach the summit when the trail has been lost due to high levels of snow. Photographing this mountain so much has helped me grow to realize just how essential a quality tripod is. In this blog post, I’ll be sharing a couple of my favorite images taken from the summit of TDH and I’ll talk about how owning a quality tripod has been essential for me in my efforts.

I went up to TDH for sunrise a morning after a fresh layer of snow blanketed the trees below. On this particular morning, it was hovering at around 10 degrees Fahrenheit. Because I was using the carbon fiber Induro CLT 204, I was able to remove my thick and cumbersome gloves and roam around the summit, setting up several shots and fine-tuning my compositions with ease. This would have been really hard to do if I was using an aluminum tripod as it would have been painfully hard to hold in the bitter cold. The 204 allowed me to stably capture quality exposures at f/18 which would have been impossible to do if I was handheld.

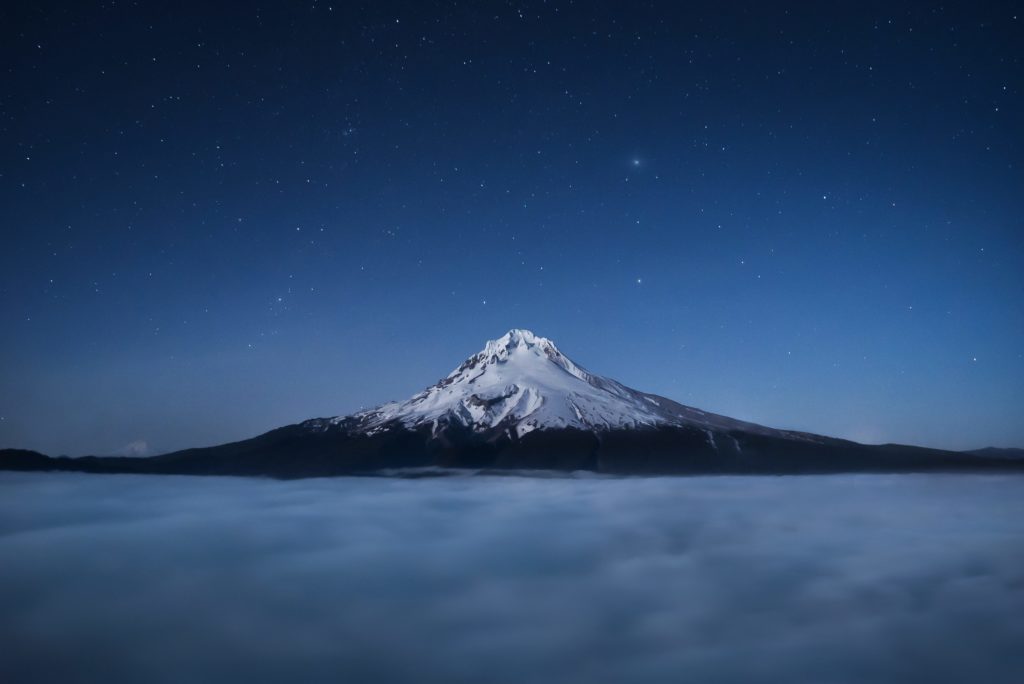
A couple years ago, I was on a flight returning to Portland at night. I remember looking out the window being above the clouds and seeing a mountain stand above it all. The image of a mountain above the clouds stuck with me and as I got more and more into photography I strived to capture something similar. To get a photo of Mount Hood above the clouds, I needed to find a day when an inversion was likely to happen. After seeing potential for my dream shot to happen, I packed my backpack with a tent, a camera body, a few lenses, sleeping bag, and some food and in hopes of it clearing and a layer of fog forming overnight. Needless to say, having the Induro CLT 104 was essential to keeping the hike up as low weight as possible while hauling up overnight equipment. Due to a late night pee break outside my tent, I realized my prediction came true and I was above a thick layer of fog and Mount Hood stood above.

Because I needed to camp overnight, packing a lightweight yet stable tripod along with the rest of my gear was essential. For overnight/extended backpacking trips, I prefer my CLT 104. With a heavier tripod, I’d compromise the amount of camera gear I could bring so I’m especially thankful that there is a tripod that perfectly fits my needs in these situations.